Steam Cloud poskytuje jednoduchý a transparentný spôsob ukladania vašich herných údajov na vzdialený úložný systém. Súbory špecifikované v konfigurácii Auto-Cloud alebo ak sú zapísané na disk, sa po existencii hry automaticky replikujú na cloudové servery Steam (pomocou Cloud API).

To je obzvlášť užitočné, ak používateľ zmení svoj počítač. Postup v hre bude obnovený buď rozhraním Cloud API alebo načítaním priamo z disku. Súbory sa automaticky stiahnu pred spustením hry, pretože by ste už zadali svoje poverenia služby Steam. Hlavnou úlohou služby Steam Cloud je zabezpečiť, aby sa všetky súbory synchronizovali so všetkými počítačmi, ktoré používateľ používa.
Používatelia majú možnosť zakázať celú cloudovú synchronizáciu prítomnú v nastaveniach Steam v klientovi. Používatelia majú tiež flexibilitu zakázať synchronizáciu cloudu na hru. Pred prechodom na tieto riešenia však aktualizujte klienta Steam na najnovšiu verziu.
Aké sú rôzne spôsoby využitia parného cloudu?
Steam ponúka dva rôzne spôsoby využitia služby Steam Cloud.
Prvým na rade je Steam Cloud API. Cloud API poskytuje sériu funkcií, ktoré vám umožňujú priamo integrovať Steam Cloud do vašej hry. Cloud API tiež plní úlohu izolácie jednotlivých používateľských súborov Steam od seba a tiež poskytuje lepšiu kontrolu nad Steam Cloudom ako celkom.
Druhým je Steam Auto-Cloud. Táto funkcia bola primárne navrhnutá pre staršie hry, kde bolo ťažké používať Cloud API. Je to rýchly spôsob, ako začať so službou Steam Cloud, ale chýba jej flexibilita a sila, ktorú poskytuje rozhranie Steam Cloud API.
Vývojárom sa odporúča používať Cloud API namiesto Steam Auto-Cloud, pretože poskytuje hlbšiu a efektívnejšiu integráciu a prispôsobenie. Umožňuje vám vyťažiť z cloudu Steam maximum.
Ako môžem vyriešiť konflikt v službe Steam Cloud?
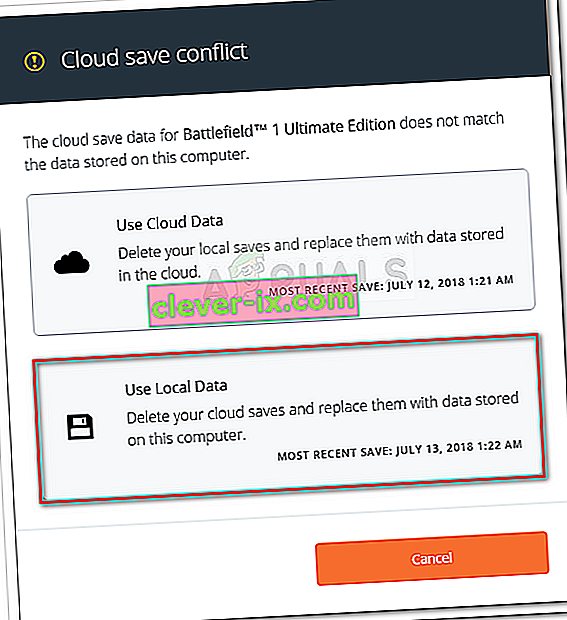
Konflikt služby Steam Cloud nastane, keď sa obsah služby Steam Cloud nezhoduje s miestnymi súbormi hier uloženými na pevnom disku. Môže sa to stať na stroji, ktorý ste v tom čase používali, alebo sa to mohlo stať už na inom stroji. Pretože bol súbor upravený na dvoch rôznych miestach bez vzájomnej synchronizácie, Steam nemôže určiť, ktorý súbor si má ponechať.

S najväčšou pravdepodobnosťou si vyberiete súbor, ktorý bol naposledy upravený. To znamená, že sa uloží najnovší vývoj vo vašej hre. Mali by ste starostlivo skontrolovať údaje zobrazené v okne. Pozorne skontrolujte dátum a čas kontextu a zodpovedajte tomu, kedy ste naposledy hrali hru na Steam. Tento kontext vám môže pomôcť pri určovaní verzie, ktorú si chcete ponechať.
Upozorňujeme, že hranie hier v režime offline zabráni synchronizácii vašich hier, čo je najpravdepodobnejšou príčinou konfliktu služby Steam Cloud.
Čo ak Steam nedokáže synchronizovať súbory do cloudu?
Táto chyba naznačuje, že Steam nemohol synchronizovať vaše miestne súbory so službou Steam Cloud. Môže to byť dočasný problém, s ktorým sa môžu stretnúť servery Steam Cloud. Stav služby Steam Cloud môžete skontrolovať na webe Steam, aby ste sa uistili, že problém je na ich strane.

Ak je cloudová služba Steam perfektne funkčná, znamená to, že problém je na vašom konci. Môžete skontrolovať pripojenie k Steam a vyriešiť problémy. Môžete tiež skontrolovať, či nemáte iba problémy so synchronizáciou so službou Steam Cloud.
Ak správu ignorujete a kliknete na „Hrať hru“, mohlo by to spôsobiť potenciálny konflikt medzi miestnymi súbormi a Steam Cloudom. Môže to mať tiež za následok stratu postupu a herné údaje.
Čo keď po presunutí na iný počítač stratím súbor alebo pokročím?
Ak vám chýba posledný postup a dvakrát ste skontrolovali, že hra používa Steam Cloud pomocou Nastavenia, znamená to, že Steam nedokázal úspešne synchronizovať vaše dáta alebo výsledkom synchronizácie bolo nahranie vašich predchádzajúcich údajov do Oblak.
Je možné, že pôvodný súbor alebo postup je stále v staršom počítači a nepodarilo sa synchronizovať. Je možné, že na danom počítači spustíte Steam, zobrazí sa váš pokrok. Ak áno, automaticky sa aktualizuje na všetkých ostatných počítačoch pripojených k vášmu účtu Steam.
Mnoho hier taktiež nevyužíva službu Steam Cloud. Ak je k dispozícii podpora Steam Cloud, môžete skontrolovať oficiálnu stránku hry. Ak nie je a nemáte prístup k staršiemu zariadeniu, znamená to, že váš pokrok je stratený a neexistuje spôsob, ako ho obnoviť.
Ako odstrániť súbory uložené v cloudových serveroch Steam?
Steam Cloud sa používa na zálohovanie pokroku každej vašej hry, aby ste nestratili svoj pokrok, ak k hre pristupujete z iného počítača. Nasledujúcim spôsobom môžete potvrdiť, že váš pokrok ukladá cloud.
Skontrolujte, či sa vaša hra nezálohuje.
- Otvorte svojho klienta Steam . Otvorte jeho Nastavenia stlačením tlačidla Steam v ľavom hornom rohu okna a výberom príslušnej možnosti.
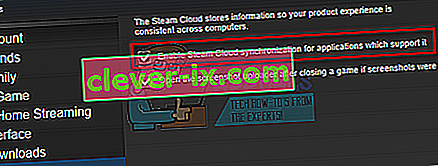
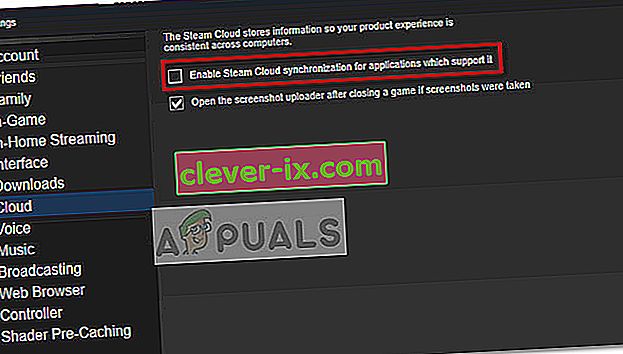
- Otvorte kartu Cloud na ľavej strane obrazovky. Skontrolujte, či je začiarknutá možnosť „ Povoliť synchronizáciu služby Steam Cloud pre aplikácie, ktoré ju podporujú “.
- Ďalej kliknite na kartu Knižnica v hornej časti klienta Steam. Tu budú uvedené všetky vaše hry.
- Pravým tlačidlom myši kliknite na hru a vyberte položku Vlastnosti . Potom prejdite na kartu Aktualizácie v hornej časti okna.
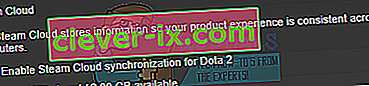
- Tu v dolnej časti okna uvidíte možnosť „ Povoliť synchronizáciu služby Steam Cloud pre [názov hry] “. Zaistite, aby bola možnosť začiarknutá .


Ak máte povolené obe možnosti, znamená to, že vašu hru zálohuje Steam Cloud a my môžeme tiež údaje vymazať.
Čo je to mechanizmus zálohovania?
Prvá vec, ktorú by ste mali vedieť, je, že existujú tri verzie uložených herných údajov
- Pôvodná verzia je uložená v priečinku AppData ( D1 ).
- Cloudová verzia je uložená v umiestnení Steam / userdata / SteamID / AppID ( D2 ).
- Cloudová verzia uložená na cloudových serveroch Steam ( D3 ).
Všimnite si poznámky (D1, D2, D3), ktoré sme použili, pretože na ne v budúcnosti budeme veľa odkazovať.
Pri prvom spustení hry sa automaticky vytvorí D1. Po dokončení hry sa údaje o hre aktualizujú v D1 a automaticky sa skopírujú do D2. Potom sa D2 synchronizuje s D3, čím sa nahrá všetok váš herný obsah.
Ak spustíte hru z iného počítača prvýkrát, ak má Steam na serveroch D3, ale na počítači nezistí D2, automaticky stiahne dáta a skopíruje D3 do D2. Steam Cloud tiež automaticky stiahne chýbajúce údaje vždy, keď spustíte Steam.
Stručne povedané, najdôležitejším údajom je pre nás D2. Ak s tým dokážeme manipulovať, môžeme úspešne vymazať údaje, ktoré chcete vymazať.
Poznámka: Niektoré hry nemajú D1 a svoje dáta si priamo ukladajú do D2. Zatiaľ čo niektoré hry nepoužívajú D2 ako médium a nahrávajú údaje do cloudu priamo z D1.
Čo je obsah používateľských údajov?
V adresári Steam / userdata by ste mali mať priečinok zodpovedajúci vášmu SteamID (vaše ID Steam si môžete skontrolovať tak, že si prečítate náš článok). Po jej otvorení sa vytvoria priečinky pre každú hru, ktorú hráte. Identifikujú sa pomocou ich AppID (AppID je možné ľahko skontrolovať návštevou hry v obchode Steam a jej extrahovaním z adresy URL). V tomto priečinku s hrami nájdete dve entity.
- remotecache.vdf: Tento súbor popisuje všetky vlastnosti súborov, ktoré sú obsiahnuté vo vzdialenom priečinku.
- Vzdialená zložka . Toto obsahuje všetky súbory, ktoré sú synchronizované s vaším serverom Steam Cloud.
Odstraňovanie údajov z cloudu
V tejto metóde vykonáme dva dôležité kroky. Najskôr vyvoláme upozornenie na konflikt služby Steam Cloud a potom súbory Cloud vymažeme.
Upozorňujeme, že ak chcete odstrániť všetok obsah cloudu Steam, museli by ste postupovať podľa týchto krokov .
Najskôr musíme z priečinka Steam odstrániť priečinok AppID. Po reštartovaní počítača a služby Steam služba Steam automaticky znova vytvorí priečinok. Tento krok musíme vykonať, aby sme zaistili, že Steam Cloud funguje perfektne, a môžeme pokračovať v časti odstránenia.
- Otvorte svoj adresár Steam . Predvolené umiestnenie pre vašu inštaláciu Steam je
C: \ Program Files (x86) \ Steam
- Search for a folder of AppID and Delete it. Then restart your computer and Steam. Start a game for a few minutes. Make sure that you have a working internet connection.
- Navigate back to the Steam directory and check if the AppID folder is back. If it is, it is confirmed that your Steam Cloud is working perfectly and we can proceed with the method.
Bringing Up Steam Cloud Conflict Dialogue
The first part of the solution is probably the most difficult. To delete all your Steam Cloud data, it is necessary to bring the conflict dialogue. Without it is not possible to delete the data present in your Cloud. Steam Cloud conflict occurs when the Cloud files differ from the data present on your hard drive.
There are two methods to bring about this conflict:
Method 1:
- Make sure that your Steam Cloud is enabled by following the steps mentioned above. Exit Steam completely by ending all the processes starting with Steamclientbootstrapper using the task manager.
- Now will alter all the files in the location
Steam\userdata\SteamID\AppID\remote
The objective is to make sure that all the files are different from those uploaded to the Steam cloud. We can’t simply delete the files from this location as Steam will automatically notice that the files are missing and download the same ones from the Cloud servers. We can achieve our task by corrupting them and making them 0-byte files.
- Navigate to
Steam\userdata\SteamID\AppID\remote
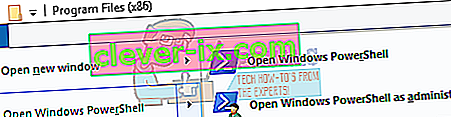
- Now hold shift and right-click on your remote folder. Select the option “Open PowerShell window here”.
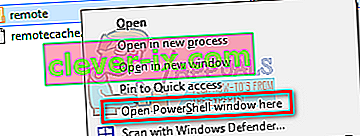
- You can also open PowerShell when in the folder by clicking the File option present at the top left side of the screen and selecting “Open Windows PowerShell as administrator”.
- Once PowerShell is opened, type the exact text written below


clc –path “C:\Program Files (x86)\Steam\userdata\SteamID\AppID\remote\*"
If you fail to write the correct code, you will get an error like this

If you correctly type in the line there will be no confirmatory message and you will get a window like this.

Start your Steam and there will be the conflict windows present on your Steam client.
Method 2:
This is an easier method as compared to the earlier one but it isn’t that efficient.
- Open your Steam client. Open its Settings by pressing the Steam button present at the top left corner of the window and selecting the option.
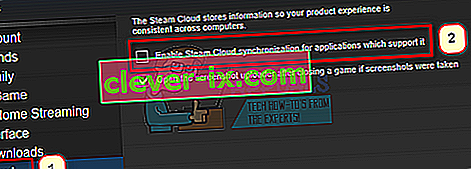
- Open the Cloud tab present on the left side of the screen. Uncheck the option “Enable Steam Cloud synchronization for the applications which support it”.

- Now navigate to your Stream directory as you did earlier and delete all files present in the folder of AppID. The file path for deletion is
Steam\userdata\SteamID\AppID.
- Now start the game to make new and different files in the file location.
- Exit the game and Steam completely by ending all Steam processes in the task manager (end steamclientbootstrapper first).
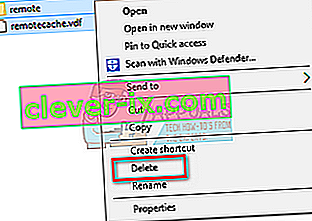
- Now delete the remotecache.vdf file present in the location
Steam\userdata\SteamID\AppID
- Start your Steam.
- Head over to the client’s Settings and enable the cloud.

Now a Steam conflict dialogue will come forth and we can proceed with the remaining method.
Deleting Cloud files
Once the Cloud conflict error is forth, don’t click any option and follow the instructions below.
- Navigate to the following file path
Steam\userdata\SteamID\AppID
and delete all the files in it. There will be two files (remote folder and remotecache.vdf). Delete both of them.
- Now go back to the conflict window and select the option of “Upload to the Steam Cloud”. Now Steam will sync your AppID folder while there will be nothing in it and the previous data on your Steam Cloud will be deleted.

- Now the game will start automatically but it will create new files that will be synced to your Steam cloud when you close it. We can prevent it from happening by pressing alt + tab. This will open the open windows on your screen. Select the Steam client from the list of windows.

- Once you are in the Steam client, open the client’s Settings. Navigate to the Cloud tab and uncheck the line which enables cloud.
- Now return to the game and exit. No files will be synced to your Steam cloud.
- Exit Steam and delete the AppID folder as we did before.


How to Make Sure If it Worked?
Remember how we checked at the beginning of this method if the Steam Cloud was running as expected by deleting the AppID folder and checking if it was made again. If there is no file present in the Steam cloud, there will be no file downloaded to your computer.
- Enable the Steam cloud as we did in the guide.
- Exit Steam completely by using the task manager.
- Delete the AppID folder (if you didn’t in step 2).
- Now check D3 (these are the cloud files) and compare them with D2 (local files on your computer). If there is nothing in D3, there will be nothing in D2 too!
- Check the following directory Steam\userdata\SteamID
No new AppID folder would have been created.
You can also check by logging Steam in on another computer and checking if the files exist.
If you make it till here without any problems, you have successfully deleted all the files on your Steam Cloud.
How to Delete Steam Cloud Saves from OS X
The procedures above can also be replicated on OS X and older Macs to a slight extent. By following the steps below, you will be able to delete your local saves. You can then disable the Steam Cloud synchronization from the Steam application, start a new game and create a few new saves. Then, when you return to re-enable the Steam Cloud synchronization features, the client will ask you which saves do you want to use. You can then choose the new ones which will delete and replace your old saves from the cloud.
To make things even clearer, here’s a step-by-step guide through the whole thing:
- Open your Steam application and go to Steam > Settings via the ribbon at the top of the window.
- In the settings menu, click on the Cloud tab and uncheck the box associated with Enable Steam Cloud synchronization for applications that support it.
- Close Steam completely and open your Finder app.
- Go to Library > Application Support > Steam > SteamApps > Common and open the folder of whichever game you want to delete the save files.
- Next, open the SAVE folder to reveal the saves of the game.
Note: If the location specified above doesn’t land you to the save files, try the following locations but mind the placeholders:
Users / *Your username* /Library / Application Support / *Game Folder* / Game Documents / *Game* / GameSaves Users/ *Your username* / Library / Application Support / Steam / userdata / *GameNumber* / remote Users/ *Your username* / Library / Containers / *Game Folder* / Data /Library / Application Support / *Game* / GameDocuments / *Game* / gamesaves
- Once you manage to identify and delete the local saves from the game you’re targeting, open the Game and create a few new saves.
- Exit the game, open steam and return to Steam > Settings > Cloud. From the cloud tab, re-enable the checkbox next to Enable Steam Cloud synchronization for applications which support it and click the OK button below.
- Steam will ask you whether you want to use the newly created local saves or the ones that you already have on the cloud. Choosing to use the new ones will delete the old saves that you currently have on Steam Cloud.