Správca úloh je program monitorujúci systém, ktorý poskytuje informácie o všeobecnom stave vášho počítača a programoch a procesoch na ňom spustených. Môže sa použiť na vynútenie zatvorenia niektorých programov / aplikácií a na vyradenie počítača z nereagujúceho stavu.
Pomocou tohto pomocného programu môžete tiež zmeniť priority procesu a zobraziť aplikácie / služby, ktoré sa spúšťajú pri štarte. Tento nástroj tiež zobrazuje podrobné informácie týkajúce sa procesora, pamäte, miestnych diskov a vášho internetového pripojenia. Je prítomný takmer vo všetkých verziách operačného systému Microsoft. Niektorí používatelia uviedli, že mali problémy s prístupom k správcovi úloh. Buď nereagoval, alebo nenašli spôsob, ako to spustiť. Uviedli sme niekoľko riešení, ktoré vám pomôžu pri riešení vášho problému.
Tu je niekoľko spôsobov, ako môžete spustiť správcu úloh.
- Stlačením Windows + R spustite v dialógovom okne príkaz Spustiť „ taskmgr “ a stlačte kláves Enter.
- Pravým tlačidlom myši kliknite na ikonu Windows v ľavej dolnej časti obrazovky a v zozname dostupných možností vyberte možnosť „ Správca úloh “.
- Stlačte Ctrl + Alt + Del . Vyjde nová obrazovka pozostávajúca z niekoľkých možností. Kliknutím na „ Správcu úloh “ v zozname možností ho otvoríte.
- Stlačením Windows + S spustite vyhľadávací panel ponuky Štart. Do dialógového okna zadajte „ Správca úloh “. Kliknite pravým tlačidlom myši na výsledok, ktorý sa zobrazí, a vyberte možnosť „Spustiť ako správca“.
Riešenie 1: Spustenie nástroja na riešenie problémov s údržbou systému
Sprievodca riešením problémov s údržbou systému bude vaše úlohy údržby systému Windows spúšťať automaticky. Automaticky zistí a opraví problémy, ako sú nefunkčné odkazy, cesty alebo skratky k súborom, ba dokonca ani chyby objemu disku. Môžeme to skúsiť spustiť a skontrolovať, či sa náš problém vyrieši.
- Stlačením Windows + S spustite vyhľadávanie v ponuke Štart. Do dialógového okna zadajte „ údržba “ a vyberte prvý výsledok, ktorý sa zobrazí.

- Po otvorení karty údržby rozbaľovaciu ponuku rozbaľte kliknutím na nadpis Údržba . Potom vyberte možnosť Spustiť údržbu v rámci možnosti Automatická údržba.

- Po kliknutí na ňu systém Windows zaháji vašu údržbu a bude vás informovať o všetkých chýbajúcich alebo nefunkčných odkazoch na skratky alebo chyby akéhokoľvek druhu.
- Reštartujte počítač, aby sa zmeny mohli uskutočniť. Ak to stále nič neopravuje, pozrite si ďalšie riešenie.
Riešenie 2: Vytvorenie iného účtu v systéme Windows 10
Je možné, že problémom, ktorým čelíte, je chyba vo vašom profile alebo vám správca neudelil prístup. Budeme sa zaoberať tým, ako upraviť register, aby ste povolili prístup správcovi úloh k vášmu účtu, ak používate obmedzený účet. Ak ste vlastníkom tohto počítača a stále nemáte prístup k správcovi úloh, môžeme skúsiť vytvoriť nový miestny účet a skontrolovať, či sa tým niečo nevyrieši.
- Otvorte účet správcu. Do dialógového okna ponuky Štart napíšte Nastavenia a kliknite na Účty .

- Teraz kliknite na možnosti „ Rodina a ďalší používatelia “ v ľavej časti okna.
- Keď ste vo vnútri, vyberte ponuku, vyberte možnosť „ Pridať do tohto počítača niekoho iného “.

- Teraz vás Windows prevedie svojím sprievodcom, ako vytvoriť nový účet. Keď sa objaví nové okno, kliknite na „ Nemám prihlasovacie údaje tejto osoby “.

- Teraz vyberte možnosť „ Pridať používateľa bez spoločnosti Microsoft “. Systém Windows vás teraz vyzve na vytvorenie nového konta Microsoft a zobrazenie okna, ako je toto.

- Zadajte všetky podrobnosti a vyberte jednoduché heslo, ktoré si môžete pamätať.
- Teraz prejdite do časti Nastavenia> Účty> Váš účet .
- V priestore pod obrázkom vášho účtu uvidíte možnosť „ Prihláste sa namiesto toho pomocou miestneho účtu “.
- Keď sa zobrazí výzva, zadajte svoje súčasné heslo a kliknite na Ďalej .
- Teraz zadajte užívateľské meno a heslo pre svoj miestny účet a kliknite na „ Odhlásiť sa a dokončiť “.
- Teraz môžete ľahko prepnúť na nový miestny účet a presunúť doň všetky svoje osobné súbory bez akýchkoľvek prekážok.
- Teraz prejdite do časti Nastavenia> Účty> Váš účet a vyberte možnosť „ Namiesto toho sa prihláste pomocou účtu Microsoft “.

- Zadajte svoje používateľské meno a heslo a kliknite na tlačidlo Prihlásiť sa.

- Skontrolujte, či správca úloh na tomto účte pracuje. Ak je, môžete bezpečne odstrániť starší účet a pokračovať v jeho používaní.
Riešenie 3: Spustenie kontroly systémových súborov
Ak vyššie uvedené riešenia neprinášajú žiadne výsledky, môžeme skúsiť spustiť kontrolu systémových súborov. Kontrola systémových súborov (SFC) je nástroj používaný v systéme Microsoft Windows, ktorý umožňuje používateľom vyhľadávať v počítači poškodené súbory v ich operačnom systéme. Tento nástroj existuje v systéme Microsoft Windows od Windows 98. Je to veľmi užitočný nástroj na diagnostiku problému a kontrolu, či nejaký problém nie je spôsobený poškodenými súbormi v systéme Windows.
Môžeme skúsiť spustiť SFC a zistiť, či sa váš problém vyrieši. Pri spustení SFC dostanete jednu z troch odpovedí.
- Windows nezistil žiadne porušenie integrity
- Program Windows Resource Protection našiel poškodené súbory a opravil ich
- Program Windows Resource Protection našiel poškodené súbory, ale nedokázal opraviť niektoré (alebo všetky) z nich
- Stlačením Windows + S spustite vyhľadávací panel ponuky Štart. Do dialógového okna zadajte príkazový riadok. Kliknite pravým tlačidlom myši na aplikáciu, ktorá sa vráti ako výsledok, a vyberte príkaz „ Spustiť ako správca “.

- Zadajte nasledujúce príkazy:

- Tento proces môže chvíľu trvať, pretože systém Windows kontroluje všetky vaše súbory a hľadá nezrovnalosti. Počkajte, kým sa proces úplne neskončí. Po dokončení a detekovaní chýb reštartujte počítač a skontrolujte, či sa problém nevyriešil.
Riešenie 4: Povolenie správcu úloh pomocou registra
We can check if your task manager is disabled by the computer’s administrator or by a virus from your registry settings. Note that Windows Registry is a powerful tool and making modifications in data entries you don’t know about could damage your PC. Be extra careful and follow the steps carefully.
- Press Windows + R to launch the Run application, type “regedit” in the dialogue box and press Enter.
- Once in the registry editor, navigate to the following file path using the left navigation pane:
HKEY_CURRENT_USER\Software\Microsoft\Windows\Current Version\Policies\System
- If the system isn’t there, you will have to create it. We will show you how to create the entire registry after this.
- Locate “DisableTaskmgr” from the list of items present. Double click it and enter the value as 0. Press Ok.

- Restart your computer and check if the problem gets solved.
If you don’t have the registry present and the file path only goes till Policies, we can try creating the registry and implementing the changes needed.
- Navigate to
HKEY_CURRENT_USER\Software\Microsoft\Windows\Current Version\Policies
- Right-click on the Policies and select New > Key.

- Name the new key as “System” and press Enter to implement the changes.
- Once in System, right-click on the empty space present at the right side of the window and select New > DWORD (32-bit) Value

- Name the new DWORD as “DisableTaskMgr” and set its value as 0.

- Save changes and exit the editor. You might need to restart your computer in order for the changes to take place.
Solution 5: Enabling Task Manager using the Group Policy Editor
Group Policy Editor is a utility in Microsoft Windows which allows you to edit the local policy settings. It can be used to enable the task manager if it is disabled.
- Press Windows + R to launch the Run application. Type gpedit.msc in the dialogue box and press Enter.
- Now navigate to the following path using the navigation pane present at the left side of the screen.
User Configuration>Administrative Templates>System>Ctrl+Alt+Del Options
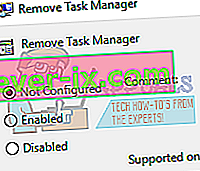
- On the right side of the screen, you will see an entry named as “Remove Task Manager”. Double-click it to open its settings.

- Now set the setting as Enabled and click on Apply. Now select Not Configured or Disabled and press Apply. The final value is Not Configured/Disabled. We selected Enabled and applied changes so the group policy can overrun any settings done by any external application or malware. Press Ok to save changes and exit. You might need to restart your computer in order for the changes to take place.

Check if the task manager opens as expected.
Solution 6: Scanning for Malware
Sometimes, this unusual behavior is caused by malware or virus present in your machine. They have special scripts that run in the background which may be extracting your data or making changes to the settings.
Scan your computer using your antivirus utility and ensure that your PC is clean. If you don’t have any specific antivirus utility installed, you can use the Windows Defender utility and scan.
- Press Windows + S to launch the start menu’s search bar. Type “Windows Defender” and open the first result which comes forward.

- At the right side of the screen, you will see a scan option. Select the full scan and click on Scan This process might take some time as Windows scans all of your computer’s files one by one. Be patient and let the process complete accordingly.

- If there was malware present on your computer, let the utility remove and restart your computer before launching the task manager.
Solution 7: Restoring your system
If all the above methods don’t work, we can try restoring your system to the last system restore point. Save all your work correctly and back up any important data. Do note that all the changes to your system configurations after the last restore point will be removed.
- Press Windows + S to launch the start menu’s search bar. Type “restore” in the dialogue box and select the first program which comes in the result.

- One in the restore settings, press System Restore present at the beginning of the window under the tab of System Protection.

- Now a wizard will open navigating you through all the steps to restore your system. Press Next and proceed with all the further instructions.

- Now select the restore point from the list of options available. If you have more than one system restore points, they will be listed here.

- Now windows will confirm your actions for the last time before it starts the system restore process. Save all your work and backup important files just in case and proceed with the process.

- Once you have successfully restored your computer, switch to tablet mode and then back to Desktop mode. Note: If you have a regular computer and don’t have the tablet mode, don’t worry. Proceed with the next instructions.
- Now try launching the task manager. You can launch it through a number of ways as explained beginning of the article.
Solution 8: Install the latest Windows updates
Windows roll out important updates targeting the bug fixes in the operating system. If you are holding back and not installing the Windows update, we strongly recommend that you do. Windows 10 is the latest Windows operating system and new operating systems take a lot of time to get perfect in every regard.
There are a lot of issues still pending with the OS and Microsoft rolls out frequent updates to target these issues.
- Press the Windows + S button to launch your start menu’s search bar. In the dialogue box type “Windows update”. Click the first search result which comes forward.

- Once in the update settings, click on the button which says “Check for updates”. Now Windows will automatically check for updates available and install them. It may even prompt you for a restart.
- After updating, check if your issue got fixed.


