0xc000000e chybe dochádza pri pokuse o spustenie programu Windows znamená, že máte čo do činenia s poškodeným BCD. Konfiguračné údaje zavádzania sú globálnym úložiskom všetkých možností a nastavení súvisiacich so zavádzaním v novších počítačoch so systémom Windows.
Táto chyba sa zobrazí pri pokuse o zavedenie zariadenia. Zobrazí sa čierna obrazovka s pokynmi na opravu počítača pomocou inštalačného disku alebo jednotky na obnovenie. Bohužiaľ, mať tento disk na obnovenie je jediný spôsob, ako vyriešiť tento problém, takže pred začatím by ste mali jeden dostať do rúk. Ak ho nemáte, je celkom ľahké si ho vytvoriť pomocou nástroja Rufus alebo Windows Media Creation z iného počítača alebo notebooku.

Budete tiež musieť zaviesť systém BIOS, aby ste zmenili poradie zavádzania a spustili počítač z obnovovacej jednotky namiesto pevného disku. Ak to chcete urobiť, postupujte takto:
- Zadajte nastavenia systému BIOS alebo UEFI stlačením klávesu určeného výrobcom základnej dosky pred zavedením systému Windows. Týmto kľúčom je zvyčajne Esc, Delete, F2, F8, F10, F12 alebo Backspace, v závislosti od výrobcu. Môžete prehľadať online, ako vstúpiť do systému BIOS, a potom nasledovať model vášho počítača.
- Keď sa nachádzate vo vnútri, prejdite na položku Zavádzanie Podľa pokynov v systéme BIOS zmeňte poradie zavádzania a ako prvé zariadenie nastavte buď disk CD-ROM alebo USB, v závislosti od toho, či je jednotkou na obnovenie disk CD alebo flash. .
- Uložte svoje nastavenia a ukončite prácu.

Metóda 1: Znova zostavte konfiguračné údaje zavádzania
Ak to chcete urobiť, budete musieť zaviesť počítač z jednotky na obnovenie. Ak ste nakonfigurovali systém BIOS podľa vyššie uvedených krokov, môžete tak urobiť stlačením ľubovoľnej klávesy, keď sa na displeji zobrazí výzva. Po zavedení počítača z jednotky na obnovenie vykonajte nasledujúce kroky na opätovné zostavenie BCD:
- V dialógovom okne Inštalácia systému Windows nastavte všetky na príslušné hodnoty, vyberte požadovaný jazyk a kliknite na ikonu
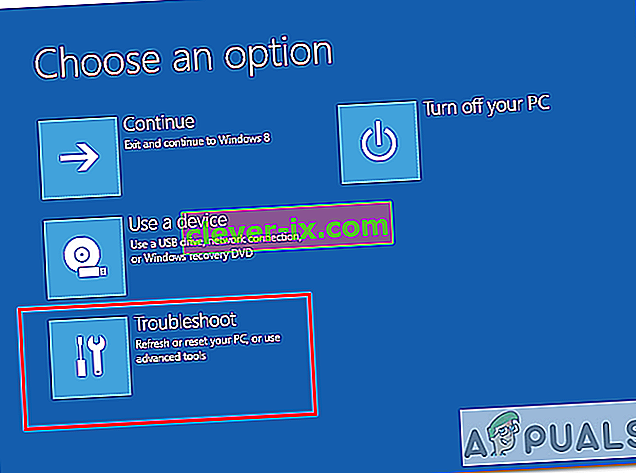
- V ľavom dolnom rohu kliknite na oprave počítača , a rozhodnúť sa Riešenie problémov z obrazovky možnosť.
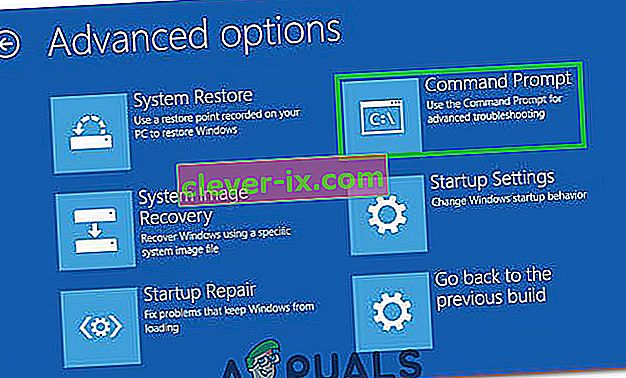
- Na obrazovke Riešenie problémov kliknite na položku Rozšírené možnosti a potom na príkazový riadok.
- Po otvorení príkazového riadku zadajte nasledujúce príkazy a po každom z nich stlačte na klávesnici kláves Enter :
bootrec / scanos bootrec / fixmbr bootrec / fixboot bootrec / rebuildbcd
- Reštartujte počítač a mal by sa správne naštartovať bez toho, aby sa problém opäť vyskytol.

Metóda 2: Opravte operačný systém pomocou jednotky na obnovenie
Táto metóda tiež opraví váš operačný systém pomocou príkazového riadku jednotky na obnovenie. Mali by ste byť schopní zaviesť systém Windows bez toho, aby ste sa problému opäť stretli. Spustite systém z jednotky na obnovenie a postupujte podľa pokynov uvedených nižšie.
- Pomocou krokov 1 až 3 z predchádzajúcej metódy sa dostanete do príkazového riadku jednotky na obnovenie.
- Keď sa nachádzate v príkazovom riadku, zadajte nižšie uvedené príkazy a za ich vykonaním stlačte kláves Enter . StartRep.exe utility koriguje hodnoty boot prostredia a mala opraviť chybu BCD. Upozorňujeme, že tento krok možno budete musieť opakovať niekoľkokrát, ak zlyhá.
cd x: \ sources \ recovery StartRep.exe
- Ak predchádzajúci krok opravy okien nepomohlo, zadajte Bcdedit v príkazovom riadku vidieť hodnoty pre Windows Boot Manager.
- Poznačte si hodnoty pre Zariadenie . Ak nie sú známe , zadajte nasledujúce príkazy a za každým ich vykonajte kláves Enter . Pamätajte, že by ste mali v prípade potreby vymeniť C: za oddiel, kde je nainštalovaný váš operačný systém.
bcdedit / set {DEFAULT.EN_US} oddiel zariadenia = c: bcdedit / set {DEFAULT.EN_US} oddiel osdevice = c: bcdedit / set {BOOTMGR.EN_US} oddiel zariadenia = c:- Po dokončení príkazového riadku ho zatvorte, vyberte jednotku na obnovenie a reštartujte systém. Teraz by to nemalo mať problémy.
Jedinou nevýhodou týchto riešení je, že si vyžadujú nápravu, trpezlivosť a pevné nervy. Ak ich však budete postupovať podľa popisu, mali by ste opraviť chybu, ktorú ste dostávali, a naďalej používať svoje zariadenie ako doteraz.
Metóda 3: Povolenie podpory Windows 10 WHQL v systéme BIOS
Nastavenie podpory Windows 10 WHQL existuje u niektorých výrobcov OEM. Má dve základné funkcie: kontroluje podpísané ovládače počas procesu bootovania a umožňuje vám povoliť podporu UEFI. Ak používate Windows 10, musíte ho povoliť, aby sa počítač mohol normálne spustiť. Ak to však nie je vybraté, môže sa váš počítač zaviesť do chyby 0xc000000e. Môžete sa teda dostať do systému BIOS a zistiť, či je povolené nastavenie podpory Windows 10 WHQL. Ak nie, skúste to.
Upozorňujeme, že nastavenie Podpora Windows 10 WHQL nie je podporované vo všetkých počítačoch. Ak ho váš počítač nemá, môžete skontrolovať, či je vo vašom počítači povolená podpora UEFI. Ak nie, môžete ho povoliť a zistiť, či chybový kód 0xc000000e zmizne. Aby ste to povolili:
- Vypnite počítač úplne a počkajte aspoň pár minút.
- Po uistení, že uplynul primeraný čas, spustite počítač späť a mali by ste si všimnúť možnosť „ Stlačením tohto tlačidla spustíte systém Bios “.
- Stlačením tlačidla nabootujete do režimu Bios.
- Po úspešnom zavedení systému v režime Bios skontrolujte, či je v BIOSe nastavenie Windows WHQL.
- Ak je prítomný, po zvýraznení pomocou klávesov so šípkami ho vyberte stlačením klávesu „Enter“ a výberom možnosti „Povolené“ ho v počítači aktivujte.

- Skontrolujte, či sa tým problém vyrieši.

Ak sa chyba bootovania Windows 10 0xc000000e stále zobrazuje po povolení nastavenia podpory Windows 10 WHQL alebo podpory UEFI, možno budete musieť resetovať konfiguráciu systému BIOS / UEFI v počítači.
Metóda 4: Obnovte BCD pomocou nástroja Easy Recovery Essentials
Easy Recovery Essentials je funkcia automatickej opravy systému na jedno kliknutie, ktorá zahŕňa úplnú opravu a rekonštrukciu BCD na vyriešenie chyby „0xc000000e“, a to aj v prípadoch, keď sa systém Windows v dôsledku chyby nespustí.
Komponent automatickej opravy bootovania EasyRE bude riešiť všetky problémy spojené s BCD, opraviť BCD alebo ho znovu vytvoriť od nuly pomocou správneho kódovania a cesty pre oddiel, ktorý sa odmieta správne načítať. Disk tiež označí ako online, aby sa zaistilo jeho správne fungovanie.
Je zaručené, že program Easy Recovery Essentials automaticky opraví chybu „0xc000000e“ pomocou zabudovanej možnosti automatických opráv. Aplikácia EasyRE je momentálne k dispozícii pre systémy Windows XP, Vista, 7, 8, 10 a je možné ju stiahnuť a vytvoriť na ľubovoľnom počítači.
- Zoznámte sa s iným počítačom, z ktorého by ste mohli vytvoriť USB, z ktorého budeme počítač bootovať.
- Stiahnite si program Easy Recovery Essentials odtiaľto.

- Napáliť obraz.
- Naštartujte počítač z disku CD alebo USB Easy Recovery Essentials, ktorý ste vytvorili.
- Keď je program EasyRE spustený, vyberte možnosť „Automatická oprava“ a kliknite na tlačidlo Pokračovať.
- Po tom, čo program EasyRE skontroluje jednotky vášho počítača, zo zoznamu vyberte a vyberte písmeno jednotky pre vašu inštaláciu systému Windows. Potom začnite kliknutím na možnosť automatickej opravy .
- Aplikácia Easy Recovery Essentials začne analyzovať problémy s vybranou jednotkou. Aplikácia EasyRE otestuje a pokúsi sa automaticky opraviť chyby na disku, diskovej oblasti, bootovacom sektore, súborovom systéme, bootloaderi a registri. Nie je potrebný žiadny zásah, pretože oprava EasyRE je plne automatizovaná.
- Po dokončení procesu oznámi spoločnosť EasyRE svoje zistenia. Kliknutím na tlačidlo Reštartovať reštartujte počítač a vyskúšajte zmeny.

Metóda 5: Obnovte konfiguráciu systému BIOS / UEFI
Niektorí používatelia uviedli, že problém s chybou 0xc000000e sa vyriešil resetovaním konfigurácie systému BIOS / UEFI. Môžete teda zvážiť vyskúšanie tejto metódy a zistiť, či je možné tento problém vyriešiť.
Krok 1. Otvorte ponuku BIOS
Ak chcete obnoviť pôvodné nastavenia systému BIOS, musíte najskôr vstúpiť do ponuky systému BIOS a nájsť možnosť Predvolené nastavenia.
Používatelia systému Windows 10 majú prístup k rozšíreným možnostiam spustenia systému Windows 10 a do ponuky BIOS. Môžete kliknúť na Štart -> Napájanie, stlačiť a podržať kláves Shift a kliknúť na tlačidlo Reštartovať, čím reštartuješ Windows do Windows Recovery Environment. Potom kliknite na položku Riešenie problémov -> Rozšírené možnosti -> Nastavenia firmvéru UEFI a kliknutím na položku Reštartovať vstúpte na obrazovku nastavení systému BIOS.
Prípadne môžete tiež počítač normálne reštartovať a stlačením požadovanej klávesy na úvodnej obrazovke spustiť okno s nastaveniami systému BIOS. Klávesová skratka sa líši od rôznych výrobcov počítačov. Môže to byť napríklad F12, Del, Esc, F8, F2 atď.
Krok 2. Vyhľadajte možnosť Predvolené nastavenia
Názov a umiestnenie možnosti „Setup Defaults“ sa môže líšiť od rôznych počítačov. Spravidla sa volá ako: Načítať predvolené, Načítať predvolené nastavenia, Načítať predvolené nastavenia, Načítať predvolené nastavenia systému BIOS, Načítať optimálne predvolené hodnoty atď.
Pomocou klávesov so šípkami na klávesnici počítača vyhľadajte na obrazovke nastavení systému BIOS predvolenú možnosť nastavenia systému BIOS. Nájdete ho na jednej z kariet systému BIOS.
Krok 3. Obnovte systém BIOS
After you find the Load Setup Defaults option, you can select it and press the Enter button to start resetting the BIOS to factory default settings in Windows 10.
At last, you can press F10 to save and exit BIOS. Your computer will automatically reboot. If you need to change BIOS settings again in the future, you can follow the same instructions to access BIOS again to change it.
Method 6: Mark Boot Disk As Online
It is possible in some cases, that the disk that you have connected to the computer or the USB that you are trying to boot from has been marked as offline by the computer. Some computers tend to prevent extra applications, hardware, and other things from being able to run as soon as the computer starts because it allows for more convenient and fast startup experience. Therefore, in this step, we will be marking the Disk as online.
You still need to use a bootable USB medium to do this job. We will show you a step-by-step guide here:
- After booting your computer from the bootable USB drive, you need to go to Next > Repair your computer. Then, you will enter WinRE.
- Go to Troubleshoot > Advanced options > Command Prompt.
- Make sure to properly enter your login credentials if you are asked by the computer.
- Type in the following command inside the command prompt to successfully launch the disk part utility on your computer.
diskpart
- Type in either one of the following commands in the next window to list the currently connected disk drives to your computer.
List Disk List Volume
- Once the disks have been listed, you need to identify the disk that contains the Windows operating system and the one that you want to mark as active.
- After identifying it, select the disk using the following command and replacing the alphabet with the driver letter of that disk.
select disk A Select Volume A (Replace A with the Drive Letter)
- After you have successfully selected the disk, you must mark the disk as online in order to initiate the recognization process of the disk at startup. Use the following commands to do that.
Online Disk Online Volume
- Type in the following command to successfully get out of the command prompt and restart your computer after that.
Exit
- Check to see if marking the Disk as online has fixed your issue.

Method 7: Check your data cables, BIOS and drivers
Unplug all HDD data cables, and then plug them again. Revert to the previous drivers and BIOS settings if they were changed, or use “Restore factory settings” option in the BIOS. Make sure to write down all current BIOS settings that were previously selected, just in case it is required to switch back. If the error is caused by a change of the SATA disk controller’s mode in the BIOS or firmware, the fix can be as simple as entering the BIOS and toggling the SATA controller’s “mode” setting. The exact instructions differ from one manufacturer to the other, but the options will resemble what is shown in the screenshots below.
To check the boot order, follow these steps:
- Restart the computer
- Press the necessary key to open the BIOS menu. This key depends on the computer manufacturer and computer model. This is usually listed on the first screen that appears on the monitor. It can be any of the following: Esc, Del, F2, F8, F10 or F12.
- If the screen shows multiple keys, find the key to open “BIOS”, “setup” or “BIOS menu”
- Attempt to toggle between all three (or more) modes until a combination that results in Windows booting successfully once more is found.
Method 8: Boot Windows In Safe Mode
If above solutions didn’t fix the problem, then Start Windows into safe mode. This will start your PC with minimum system requirements, will not load startup programs, add-ons etc. And allow performing troubleshooting steps to fix Boot Error 0xc000000e:
Before you enter the safe mode, you need to enter the Windows Recovery Environment (winRE). To do this, you will repeatedly turn your device OFF, then ON:
- Hold down the power button for 10 seconds to turn off your device.
- Press the power button again to turn on your device.
- On the first sign that Windows has started (for example, some devices show the manufacturer’s logo when restarting) hold down the power button for 10 seconds to turn off your device.
- Press the power button again to turn on your device.
- When Windows restarts, hold down the power button for 10 seconds to turn off your device.
- Press the power button again to turn on your device.
- Allow your device to fully restart and you should boot into the Windows Recovery Environment.
Now that you are in the Windows Recovery Environment, you will follow these steps to take you to safe mode:
- On the Choose an option, screen, select “Troubleshoot” and then “Advanced options.”
- Now click on “Startup Settings” and click on “Restart.”
- After your device restarts, you’ll see a list of options. Select option “4” from the list or press “F4” to enter Safe Mode.

Note: If you need to exit safe mode, simply restart your device, or:
- Press the “Windows logo key + R.”
- Type “msconfig” in the Run box and then select “OK”.

- Select the Boot tab and under Boot options, clear the Safe boot checkbox.

Method 9: Check your disk with CHKDSK utility
If the hard drive has its file integrity compromised, it is possible to use built-in Windows CHKDSK utility to scan the disk and fix the file system errors.
- Connect a USB drive that has been made bootable or insert the Windows Installation Disk on your computer.
- After connecting one of these, boot from that connected device.
- After booting your computer from the device, click on “Next” and then on the “Repair your Computer” option.
- On the next window, click on “Troubleshoot” and then on the “Advanced” Option.

- On the next screen, make sure to select the “CommandPrompt” option to successfully launch into the command prompt.
- Provide the login credentials of your account in order to boot inside the cmd.
- Inside the command prompt, type in the following command to successfully run the check disk utility on your computer.
chkdsk C: /f (Make sure to replace the "C" with the Drive letter of your partition).
- Confirm any on-screen prompts and wait for the scan to be fully completed.
- Check to see if the issue is fixed by performing this step.
Method 10: Disable fast startup Feature
If your computer has been set up to use the Fast Startup feature, you might be getting this error message on your screen because of doing so. The Fast Startup feature is known to malfunction with some operating systems and hardware combinations.
Basically, when enabled, the feature automatically sends some launch configurations to be stored in your RAM to allow for a faster startup as indicated by its name but this configuration data can sometimes be corrupted which can lead to this error on your computer. Therefore, in this step, we will be disabling it completely. For that:
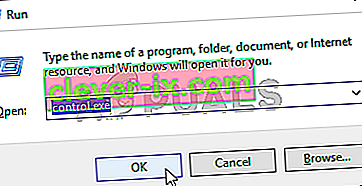
- Press “Windows” + “R” to open the Run prompt.
- Type in “Control Panel” and press “enter” to launch the classical Control Panel interface.
- Inside the control panel, click on the “Hardware and Sound” option and then select the “Power Options” button.

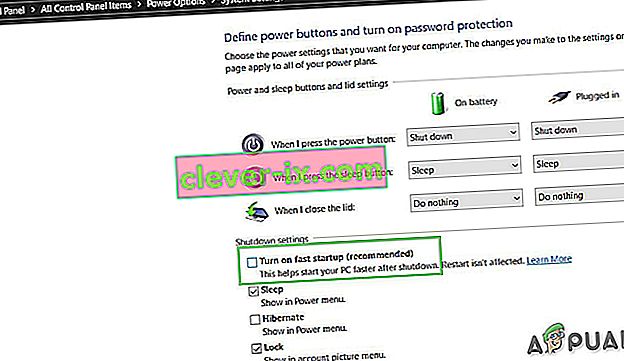
- Inside the power options, click on the “Choose what the power button does” from the left side.
- Click on the “Change Settings” option if the fast startup option is greyed out.
- Make sure to uncheck the “Turn on Fast Startup” option and save your changes.
- Closeout of the window and terminate any unnecessary applications.
- Click on the “Start Menu”, click on the “Power Options” and select “Shutdown” from the list.
- This option should completely power down your computer and after performing a complete shutdown, wait for some minutes before turning your computer back on.
- After the computer turns back on, check to see if the error message is fixed.
Note: This solution can only be applied if you are able to sometimes boot up your computer normally and are only encountering this error momentarily.


Method 11: Repair Corrupted System Files
It also possible in some situations that certain system files might have been corrupted due to a storage failure or due to some other reason. Therefore, in this step, we will be performing a complete repair of the corrupted system files and then we will check to see if doing so fixes this issue. For that:
- Press “Windows” + “R” to open the Run prompt.
- Type in “cmd” and then press “Shift” + “Ctrl” + “Enter” to launch the command prompt with admin privileges.

- Type in the following commands one by one and press “Enter” after each to successfully run an SFC scan and a DISM Scan on your computer.
DISM /Online /Cleanup-Image /RestoreHealth sfc /scannow
- Restart your computer completely once these scans are completed.
- Check to see if by performing these scans, you were able to fix this issue on your computer.

Method 12: Run Windows Startup Repair
Startup Repair is capable of diagnosing and fixing the found issues. For example, it can automatically scan system files, registry settings, configuration settings, etc. and try to fix the problem on its own. Startup Repair is especially useful when your computer is unbootable. Since your computer fails to boot, Windows can boot into WinRE automatically. While, if it doesn’t appear, you can interrupt the boot process three times in a row, and then the WinRE screen appears. Alternatively, if you have a bootable USB medium, you can also set your computer to boot from it and go to Repair your computer to enter WinRE.
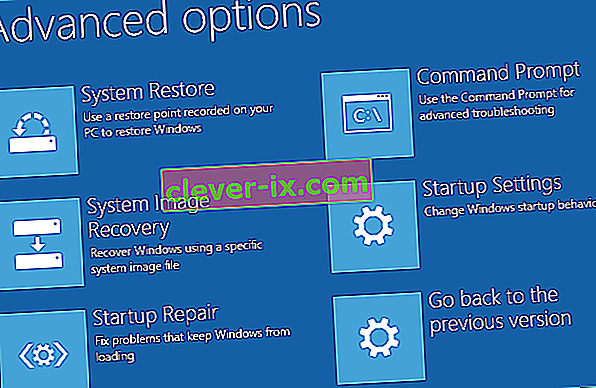
After you have successfully booted into the Windows Recovery Environment, click on the “Troubleshoot” option, and from there, select the “Advanced Options” screen. Inside the advanced options, select the “StartupRepair” button to successfully initiate the Startup Repairing process. Windows will begin to diagnose your computer automatically. When the process ends, your computer will restart automatically. You can wait to see whether it can boot successfully.

Riešenie: Pred skokom do príkazového riadku alebo opravou pri spustení skontrolujte, či nie sú pripojené žiadne ďalšie zariadenia. Najlepšie je vyskúšať iný reštart s čo najmenším počtom zariadení a externých jednotiek pripojených k počítaču. Takto sa zabezpečí, že nič, čo bolo do počítača pridané nedávno, nespôsobuje tento problém. Najlepšie by bolo odpojiť všetky nedávne jednotky USB, CD, DVD atď. Patrí sem aj čítačka pamäťových kariet. Uistite sa, že sú odpojené všetky externé jednotky a USB kľúče alebo USB flash disky, potom to skúste znova.


