Ako opraviť & lsquo; vo vašej aplikácii došlo k nespracovanej výnimke & rsquo; Chyba v systéme Windows?
„ K neošetrenej výnimke win32 sa vyskytla chyba * application_name * “, chyba sa zvyčajne vyskytuje, keď sa používateľ pokúsi spustiť aplikáciu, ktorá bola vytvorená v Visual Studio. Najčastejšie uvádzané prípady tejto chyby sú spojené s programami Uplay, Internet Explorer a niekoľkými starými hrami, ktoré boli pôvodne vytvorené pre staršie verzie systému Windows.

Poznámka : Tu je postup, ako opraviť Runtime knižnicu súvisiacu s Visual C ++.
Čo spôsobuje chybu „Vo vašej aplikácii došlo k nespracovanej výnimke“?
Existuje niekoľko jednoduchých príčin tohto problému a problém je možné efektívne vyriešiť, ak dokážete rozpoznať svoj scenár jednoducho na základe identifikácie správnej príčiny. Pozrite sa na zoznam nižšie:
- Môže za to váš antivírus - Je známe, že tento problém spôsobili niektoré antivírusové nástroje, napríklad Panda Antivirus, preto ich vymeňte.
- Môžu byť spustené určité programy alebo škodlivý softvér - Ak je v počítači spustený nainštalovaný program alebo škodlivý softvér, možno by ste sa ho mali zbaviť. Uistite sa, že bootujete do čistého bootovania, aby ste zistili, či je to správna príčina.
- Inštalácia rozhrania Microsoft .NET Framework je poškodená - Ak sú poškodené jej základné súbory, môžete skúsiť opraviť jej inštaláciu, nainštalovať novšiu verziu alebo vykonať kontrolu SFC.
- Ladenie skriptov je povolené prostredníctvom databázy Registry - Ako sa ukázalo, konkrétny kľúč registra môže prispieť k zjaveniu tohto problému. Aby ste sa o to postarali, musíte deaktivovať ladenie skriptov pomocou kľúčov databázy Registry.
- Porušenie prístupu v Msvcr92.dll - prekročenie zdrojovej medzipamäte alebo nesprávny konečný bajt sú tiež potenciálnymi príčinami tohto problému. Ak ich chcete osloviť, budete si musieť nainštalovať všetky čakajúce aktualizácie systému Windows.
- Odstránenie kľúča registra spúšťača Ubisoft - Ak sa vám pri pokuse o spustenie súboru Uplay.exe zobrazí táto chyba, je to kvôli chybe v spúšťači hier Ubisoft. Tento problém je možné vyriešiť aj pomocou registra odstránením hodnoty patriacej tomuto spúšťaču.
- Poškodenie systémových súborov - Tento problém môže spôsobiť aj nekonzistencia systémových súborov. Ľahké poškodenie je možné vyriešiť jednoduchým skenovaním DISM a SFC. V závažnejších prípadoch by vám mala pri riešení problému pomôcť čistá inštalácia alebo oprava.
Riešenie 1: Nainštalujte všetky čakajúce aktualizácie Windows Update
Jednou z najbežnejších príčin, ktorá nakoniec spôsobí chybu „ Došlo k neošetrenej výnimke win32 “, je aplikácia, ktorá bola vytvorená pre platformu x64 pomocou programu MSVCR90.DLL, ktorý nakoniec zavolá funkciu strncpy.
V takom prípade porušenie prístupu spustené v súbore Msvcr92.DLL s najväčšou pravdepodobnosťou spôsobí, že aplikácia prestane reagovať vo funkcii strncpy. Najpravdepodobnejšia príčina tohto problému je prekročenie vyrovnávacej pamäte zdroja alebo nesprávny konečný bajt.
Spoločnosť Microsoft, našťastie, o tomto probléme už vie a vydala pre tento problém rýchlu opravu, ktorá ju automaticky vyrieši. Aby ste to mohli využiť, stačí aktualizovať verziu operačného systému na najnovšiu dostupnú verziu.
Poznámka: Táto rýchla oprava bola zavedená v rámci revízie balíka Visual Studio 2008, ktorú systém Windows automaticky aktualizuje, takže kroky uvedené nižšie sú univerzálne a mali by fungovať bez ohľadu na verziu vášho operačného systému.
Tu je stručný sprievodca aktualizáciou zostavy systému Windows na najnovšiu verziu, aby ste mohli nainštalovať rýchlu opravu pre Visual Studio 2008 a vyriešiť problém:
- Stlačením klávesu Windows + R otvorte dialógové okno Spustiť . Ďalej zadajte „ms-settings: windowsupdate“ a stlačením klávesu Enter otvorte kartu Aktualizácia systému Windows v aplikácii Nastavenia .

Poznámka: V prípade, že sa tento problém vyskytne v systéme Windows 7 alebo Windows 8.1. použite , wuapp ' namiesto príkazu.
- Keď sa vám podarí doraziť na obrazovku Windows Update, začnite kliknutím na Vyhľadať aktualizácie . Potom začnite postupovať podľa pokynov na obrazovke a dokončite inštaláciu každej služby Windows Update, ktorá momentálne čaká na inštaláciu.
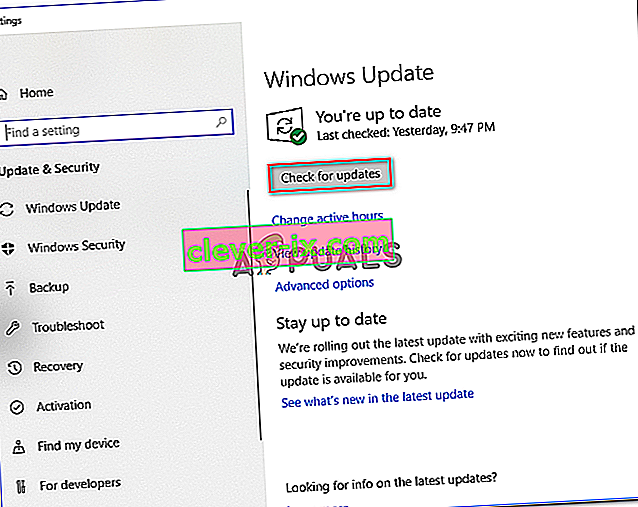
Poznámka: Pamätajte na to, že je nevyhnutné, aby ste si nainštalovali každú aktualizáciu, nielen kritickú. Pretože rýchla oprava je zahrnutá v revízii balíka Visual Studio, príslušnú aktualizáciu nájdete v časti Voliteľné, takže si musíte nainštalovať všetky.
- V prípade, že sa zobrazí výzva na reštartovanie skôr, ako budete mať možnosť nainštalovať všetky dostupné aktualizácie, urobte to. Po dokončení nasledujúceho spustenia sa však nezabudnite vrátiť na tú istú obrazovku, aby ste mohli dokončiť inštaláciu zvyšných aktualizácií.
- Po nainštalovaní všetkých čakajúcich aktualizácií reštartujte počítač ešte raz a potom zopakujte akciu, ktorá predtým spôsobovala chybové hlásenie, aby ste zistili, či je problém odstránený.


Ak sa stále stretávate s chybou „ Vyskytla sa neošetrená výnimka win32 “, prejdite nižšie na nasledujúcu metódu.
Riešenie 2: Vymeňte antivírusový program
Bezplatné antivírusové nástroje môžu byť veľmi užitočné a môžu robiť svoju prácu pri ochrane vášho počítača, ale niekedy jednoducho nevychádzajú dobre s ostatnými vecami v počítači. Zvážte výmenu antivírusového programu, ak spôsobuje tento problém, keď je zapnutý!
- Kliknite na ponuku Štart a hľadaním otvorte Ovládací panel . Prípadne môžete kliknúť na ikonu ozubeného kolieska, aby ste otvorili nastavenia, ak používate Windows 10.
- V ovládacom paneli vyberte možnosť Zobraziť ako - kategóriu v pravom hornom rohu a v časti Programy kliknite na položku Odinštalovať program .

- Ak používate aplikáciu Nastavenia, kliknutím na Aplikácie by sa mal okamžite otvoriť zoznam všetkých nainštalovaných programov v počítači.
- Vyhľadajte antivírusový nástroj v Ovládacom paneli alebo v Nastaveniach a kliknite na Odinštalovať .
- Mal by sa otvoriť jeho sprievodca odinštalovaním, takže ho podľa pokynov odinštalujte.

- Keď odinštalačný program dokončí proces, kliknite na tlačidlo Dokončiť a reštartujte počítač, aby ste zistili, či sa chyby stále objavia. Určite si vyberte lepšiu možnosť antivírusového programu .
Riešenie 3: Odstránenie hodnoty Launcher Registry (ak je k dispozícii)
Ak sa pri pokuse o spustenie súboru Uplay.exe alebo inej aplikácie patriacej spoločnosti Ubisoft vyskytla chyba „ Vyskytla sa neošetrená výnimka win32 “, je to pravdepodobne kvôli chybe v ich spúšťači hier Ubisoft.
Ako sa ukázalo, v systéme Windows 10 sa to javí ako rozšírený problém, najmä medzi používateľmi, ktorí majú súčasne nainštalovaný Steam aj Uplay.
Niekoľko postihnutých používateľov, s ktorými sa snažíme tento problém vyriešiť, sa to podarilo opraviť pomocou editora databázy Registry, ktorý vyhľadal hodnotu reťazca registra patriacu k spúšťaču a odstránil ju. Toto údajne eliminuje konflikt a umožňuje obidvom aplikáciám správne fungovať pod rovnakým strojom.
Tu je rýchly sprievodca odstránením hodnoty registra súvisiacej so spúšťačom Uplay:
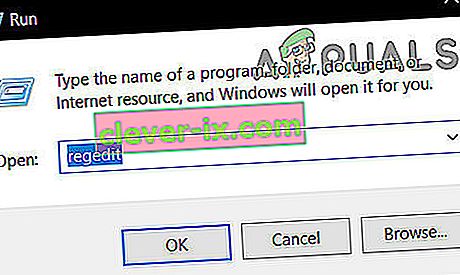
- Stlačením klávesu Windows + R otvorte dialógové okno Spustiť . Do textového poľa zadajte príkaz „regedit“ a stlačením klávesu Enter otvorte Editor databázy Registry . Keď sa zobrazí výzva UAC (Kontrola používateľských kont) , zadajte Áno a udeľte oprávnenie správcu.
- Keď sa nachádzate v editore databázy Registry , použite ľavú časť okna na navigáciu na nasledujúce miesto:
Počítač \ HKEY_LOCAL_MACHINE \ SOFTWARE \ WOW6432Node \ Ubisoft
Poznámka: Môžete tam buď navigovať manuálne, alebo môžete vložiť miesto priamo do navigačného panela v hornej časti a okamžite sa tam dostať stlačením klávesu Enter .
- Keď sa vám podarí pristáť na správnom mieste, posuňte sa nadol do pravej časti obrazovky, kliknite pravým tlačidlom myši na spúšťač a vyberte možnosť Odstrániť .
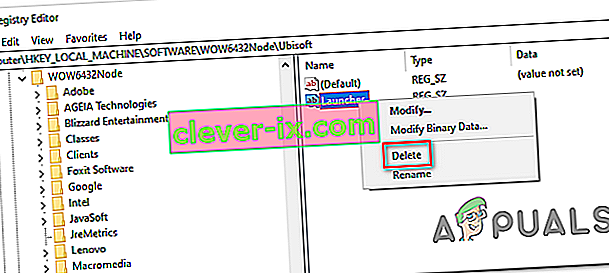
Poznámka: V prípade, že môžete kľúč odstrániť, môžete prevziať vlastníctvo kľúčov registra nasledujúcim spôsobom.
Poznámka: Po odstránení bude spúšťač nútený vytvoriť novú hodnotu reťazca spúšťača s novými údajmi, ktorá by mala problém vyriešiť.
- Po odstránení kľúča zatvorte Editor databázy Registry a reštartujte počítač.
- Pri ďalšom spustení počítača zopakujte akciu, ktorá predtým spôsobovala chybu „ Vyskytla sa neošetrená výnimka win32 “ a skontrolujte, či je problém vyriešený.


Ak ten istý problém pretrváva, prejdite nižšie k ďalšej potenciálnej oprave nižšie.
Riešenie 4: Obnovte program Internet Explorer (ak je k dispozícii)
Ďalšou možnou inštanciou, ktorá by mohla vytvoriť tento problém, je séria poškodeného programu Internet Explorer (IE). Ak sa stretávate s chybou „Je pravdepodobné, že v nespracovanej výnimke win32 došlo k chybe iexplore.exe“, ktorá sa zobrazí po zlyhaní skriptu.
To fix this issue, you should reset your Internet Explorer settings via the Internet Options menu. This operation was confirmed to be successful by a lot of users that were dealing with this error.
Here’s a quick guide on resetting Internet Explorer in order to resolve the “An unhandled win32 exception occurred‘ error:
- Ensure that Internet Explorer, Edge or any other associated instance is turned off and no background process is running.
- Press Windows key + R to open up a Run dialog box. Inside the text box, type ‘inetcpl.cpl’ and press Enter to open up the Internet Options menu.
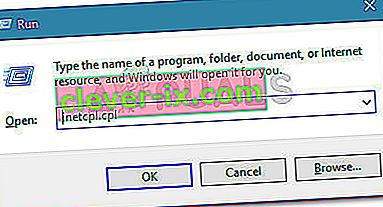
Note: If you are prompted by the UAC (User Account Control), click Yes to grant administrative privileges.
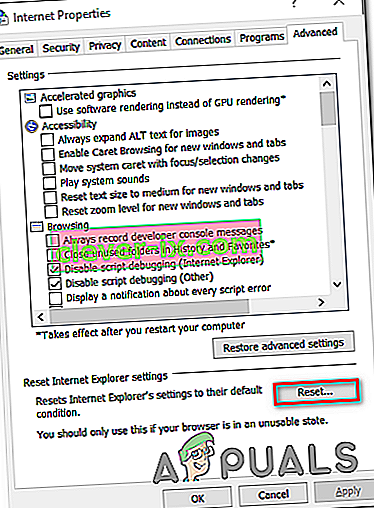
- After you manage to get inside the Internet Properties screen, select the Advanced tab from the horizontal menu at the top. Next, go to the Reset Internet Explorersettings and click on the Reset button.
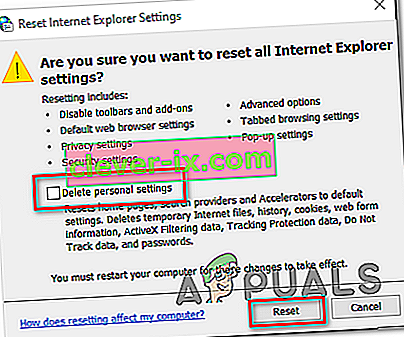
- Once you see the confirmation screen, ensure that the box associated with Delete personal settings is checked, then click on the Reset button.
- Wait until the operation is complete, then restart your machine and see if the issue is resolved at the next computer startup.


In case the same “An unhandled win32 exception occurred in iexplore.exe’ error is still occurring, move down to the next method below.
Solution 5: Disable Script Debugging and associated Registry Keys (if applicable)
If you’re encountering the issue with Internet Explorer on a machine that has VS installed on it, the issue can also occur due when Script Debugging is enabled and the registry entries end up containing corrupted data.
Several affected users that encountered this issue have confirmed that the issue was resolved after they accessed the Internet Options menu to disable Script Debugging and then deleted the associated keys using Registry Editor.
Here’s a quick guide on doing this in order to fix the “An unhandled win32 exception occurred in iexplorer.exe’ error:
- Press Windows key + R to open up a Run dialog box. Next, inside the text box, type ‘inetcpl.cpl’ and press Enter to open up the Internet Options menu. If you are prompted by the User Account Control (UAC), click Yes to grant administrative privileges.

- Once you manage to find yourself inside the Internet Properties screen, use the menu at the top to select the Advanced tab.
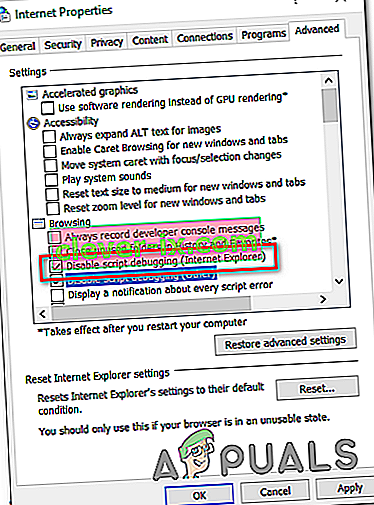
- Inside the Internet Properties screen, scroll down through the Settings menu and check the box associated with Disable script debugging (Internet Explorer).
- Once the modification is enforced, hit Apply to save the changes, then close the Internet Properties window.
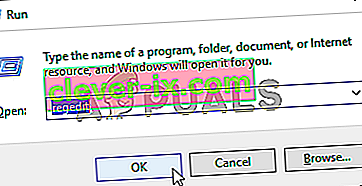
- Press Windows key + R once again to open up another dialog box. This time, type ‘regedit’ and press Enter to open up Registry Editor. You will need to grant admin access, so click Yes when prompted by the User Account Control window.
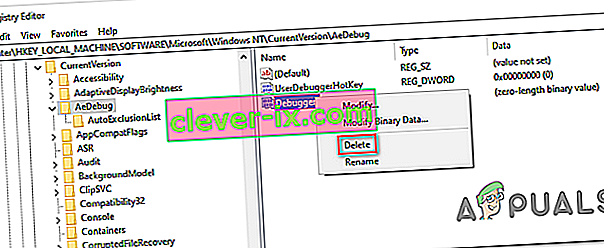
- Inside the Registry Editor, navigate to the following location using the left-hand menu:
HKEY_LOCAL_MACHINE\SOFTWARE\Microsoft\Windows NT\CurrentVersion\AeDebug (32 - Bit Machine) HKEY_LOCAL_MACHINE\SOFTWARE\Wow6432Node\Microsoft\Windows NT\CurrentVersion\AeDebug (64 - Bit Machine)
Note: The location of the file we need to delete is different depending on the Windows version that you’re using. If you have a 32 – bit Windows version use the first location, else, use the second.
- Once you arrive to the correct location, move down to the right-section, right-click on Debugger and choose Delete from the context menu.
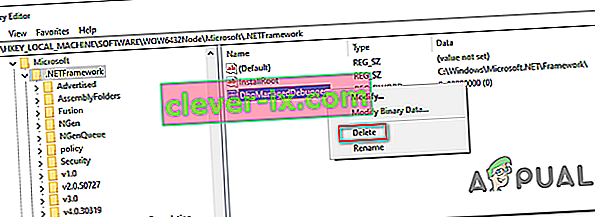
- Once this key is deleted, navigate to this second location:
HKEY_LOCAL_MACHINE\SOFTWARE\Microsoft\.NETFramework\ (32 - Bit Machine) HKEY_LOCAL_MACHINE\SOFTWARE\Wow6432Node\Microsoft\.NETFramework (64 - Bit Machine)
Note: Access the registry key associated with your Windows bit version that you’re using.
- When you arrive at the correct location, move over to the right-hand section and delete the DbgManagedDebugger value by right-clicking on it and choosing Delete from the context menu.
- After you manage to delete the value, close the Registry Editor and restart your computer.
- Once the next startup is complete, see if the same issue is still occurring.


In case the “An unhandled win32 exception occurred’ error is still occurring, move down to the next method below.
Solution 6: Install the Latest Version of NET Framework and Repair it
Having NET Framework installed on your computer is vital and plenty of modern games and programs depend on you having it installed. Before repairing it, follow the steps below in order to install the latest version on your computer.
Navigate to this link and click the red download button in order to download the latest version of the Microsoft .NET Framework. After the download has finished, locate the file you downloaded and run it. Note that you will need to have constant access to the Internet. Follow the instructions on-screen to proceed with the installation.
- After installing the latest version, it’s time to check its integrity. On your keyboard, use the Windows Key + R key combination to open the Run dialog box.
- Type in control.exe and click OK in order to open it.

- Click the Uninstall a Program option and click Turn Windows features on or off. Make sure you locate the .NET Framework 4.x.x entry and make sure it’s enabled. ‘x.x’ marks the latest version available for your operating system.
- If the checkbox next to .NET Framework 4.x.x is not enabled, enable it by clicking the box. Click OK to close the Windows Feature window and reboot the computer.

- If .Net Framework 4.x.x is already enabled, you can repair .Net Framework by clearing the box and rebooting the computer. After the computer has restarted, re-enable .Net Framework and restart the computer again.
Solution 7: Perform a Clean Boot
There are various other programs and services which can affect the proper functionality of the Microsoft .NET Framework suite. In most cases, the cause is the antivirus you have installed and you can try disabling it to see if the error persists. However, to make sure nothing can interfere with the installation, we recommend you perform a clean boot which will disable all non-Microsoft programs and services from starting up. This way, you can easily deduct just which program causes this error to happen!
- Use the Windows + R key combination on your keyboard. In the Run dialog box type MSCONFIG and click OK.
- Click on the Boot tab and uncheck the Safe Boot option (if checked).

- Under the General tab in the same window, click to select the Selective startup option, and then click to clear the Load startup items check box to make sure it’s not checked.
- Under the Services tab, click to select the Hide all Microsoft services check box, and then click Disable all.

- On the Startup tab, click Open Task Manager. In the Task Manager window under the Startup tab, right click on each startup item which is enabled and select Disable.

- After this, you will need to perform some of the most boring processes and that is enabling the Startup items one by one and restarting your computer. After that, you need to check whether the problem appears again. You will need to repeat the same process even for the Services which you have disabled in Step 4.
- Once you locate the problematic startup item or service, you can undertake action in order to solve the problem. If it is a program, you can reinstall it or repair If it is a service, you can disable it, etc.
Solution 8: Use SFC to Scan for Memory Leaks
It has been reported that the Microsoft .NET Framework corruption is related to faulty system files. These problems are rooted deep inside the system files and the only way to try to resolve them is by running the System File Checker (SFC). It will scan your system files for errors and possible repair or replace them. Follow the steps below in order to do so!
- Search for “Command Prompt” by typing it either right in the Start menu or by pressing the search button right next to it. Right-click the first entry which will pop up as a search result and select the “Run as administrator” context menu entry.
- Additionally, you can also use the Windows Logo Key + R key combination in order to bring up the Run dialog box. Type in “cmd” in the dialog box which appears and use the Ctrl + Shift + Enter key combination for admin Command Prompt.

- Type in the following commands in the window and make sure you press Enter after typing each one. Wait for the “Operation completed successfully” message or something similar to know that the method worked.
sfc /scannow
- Try to restart your computer and check to see if the Unhandled Exception has Occurred in your Application error continues to appear on your computer.
Solution 9: Performing a Clean Install
If none of the methods presented below have managed to help you in resolving the issue, it’s very likely that you’re dealing with some kind of Windows inconsistency that cannot be resolved conventionally.
If this scenario is applicable, you should be able to fix the issue by resetting every component associated with your Windows installation. If you want to go this route, you have two ways forward. It all boils down to the procedure that you want to follow:
- Repair install (in-place repair) – This procedure is the best approach when you need to refresh every OS component, but some users might end up considering it a little too tedious for their taste. Keep in mind that you will need a compatible installation media in order to enforce this fix, but the major advantage is that all your personal data (including games, applications and personal media) will be preserved even if you don’t back up your computer.
- Clean install – If you’re looking for the simplest solution, this is the way to go. You will not need an installation media to enforce it (it’s all done through the Windows GUI). But unless you back up your data in advance, be prepared for total data loss.


