Windows 10 je jednou z najočakávanejších verzií systému Windows od spoločnosti Microsoft. Aj keď Windows 8 vytvoril nový trend vo svete desktopových OS, mal určité problémy v dizajne a výkone, ktoré boli hlavným zameraním spoločnosti Microsoft na Windows 10. Konečné zostavenie systému Windows 10 bolo teda predstavené 29. júla 2015 pre Desktop as rovnako ako Smartphony.
Zahŕňal veľa úprav, pričom zohľadňoval chyby systému Windows 8. V skutočnosti ide o pokročilú verziu systému Windows, každý deň sa však u rôznych používateľov vyskytnú rôzne následky .
Hlavnou súčasťou týchto dôsledkov sú chyby, ktoré sa prejavia pri pokuse o vykonanie konkrétnej úlohy. Mnoho ľudí narazilo na chybové hlásenie pri pokuse o otvorenie iného softvéru a prehľadávača v systéme Windows 10. K tejto chybe patrí chybové hlásenie s hlásením, že aplikáciu sa nepodarilo správne spustiť (0xc0000005). Kliknutím na tlačidlo OK aplikáciu zatvoríte . Táto chyba sa zvyčajne vyskytuje v internetových prehliadačoch, ale nie je na ne obmedzená. Akákoľvek aplikácia vo Windows môže prestať reagovať kvôli tejto chybe. Je teda potrebné ho opraviť, aby sa tento základný softvér vrátil späť do práce.

11/12/2016: Používatelia oznámili, že nižšie uvedené metódy budú fungovať aj v systéme Windows 7.
Dôvod chyby 0xc0000005 v systéme Windows 10:
Existuje niekoľko známych dôvodov, ktoré spôsobujú, že táto chyba narúša činnosť rôznych softvérov v systéme Windows 10. Jedným z dôvodov, ktoré sa považujú za hlavnú príčinu, je antivírusový program tretej strany, ktorý spôsobuje konflikty so spustiteľnými súbormi a ovplyvňuje ich činnosť. Na druhej strane sa registre môžu poškodiť v dôsledku malvéru a vírusov, ktoré spôsobujú abnormálne správanie programov. Túto chybu môžu niekedy spôsobovať aj zlé ovládače hardvéru .
Riešenia na opravu chyby Windows 10 0xc0000005:
Na základe vyššie uvedených dôvodov sú riešenia jednoznačné. Prejdite teda nasledujúce metódy, aby ste sa zbavili tejto frustrujúcej chybovej správy.
Oprava poškodených systémových súborov
Stiahnite si a spustite Restore skenovať a obnoviť poškodené a chýbajúce súbory z tady , raz urobil pokračovať nižšie uvedených riešení. Pred pokračovaním v riešení uvedenom nižšie je dôležité zabezpečiť, aby boli všetky systémové súbory neporušené a nepoškodené.
Metóda 1: Oprava antivírusového programu
Antivírusové programy môžu ovplyvniť spustiteľné súbory mnohých programov. Na vyriešenie tohto problému je preto potrebné deaktivovať antivírusový program iného výrobcu, aby ste skontrolovali, či to bol vinník alebo nie. Upozorňujeme, že zakázanie antivírusových programov môže viesť k vážnym hrozbám pre váš počítač po pripojení k internetu.
Môžete sa tiež spoľahnúť na vlastný bezpečnostný softvér systému Windows, tj. Windows Defender . Má rovnakú funkcionalitu ako akýkoľvek iný antivírus. Antivírus môžete deaktivovať tak, že prejdete na jeho Nastavenia a vypnete štít.

Po deaktivácii znova skontrolujte chybu. Ak stále pretrváva, prejdite na ďalšiu metódu.
Metóda č. 2: Oprava registrov
Registra je centrálna databáza systému Windows, ktorá je neustále používajú počítače, aby sa mohla čítať mnoho rôznych súborov a nastavení, ktoré je potrebné spustiť. Registre sa môžu poškodiť v dôsledku poškodenia niektorých určitých súborov, ktoré sú potrebné na zhromaždenie všetkého na miesto. Väčšina odborníkov preto odporúča, aby ste si nezabudli zálohovať svoj register a uchovať túto zálohu na konvenčnom USB kľúči, aby ste mohli v prípade poškodenia obnoviť váš register v predchádzajúcom stave. Ak ste však nezálohovali svoj register, postupujte podľa týchto pokynov na opravu registrov, aby ste vyriešili chybu 0xc0000005 .
1. Stiahnite si softvér na čistenie registrov z tohto odkazu .
2. Po stiahnutí ho nainštalujte pomocou odporúčaných nastavení. Po dokončení procesu inštalácie otvorte softvér.
3. V rozhraní kliknite na kartu Register, ktorá sa nachádza na ľavom paneli, a kliknite na tlačidlo označené ako Vyhľadávať problémy . Spustí sa vyhľadávanie chýb v registri a po dokončení vyhľadávania sa aktivuje tlačidlo Opraviť vybraný problém . Kliknite na toto tlačidlo a všetko bude opravené.

Metóda č. 3: Oprava chybných ovládačov
Ovládače sú softvérové programy, ktoré pomáhajú počítaču komunikovať s hardvérom, ktorý je k nemu pripojený. Takže keď sú poškodené, hardware má tendenciu spôsobovať poruchy . Oprava týchto chybných potápačov vám môže pomôcť rôznymi spôsobmi. Postupujte podľa pokynov uvedených nižšie.
1. Otvorte Správca zariadení pomocou stlačenia Win + X a výberom zo zoznamu.
2. Vo vnútri Správcu zariadení posuňte zobrazenie nadol a zistite, či existuje hardvér so žltou značkou. Ak existuje, kliknite pravým tlačidlom myši tam a vyberte Aktualizovať softvér ovládača . Ak ste nedávno nainštalovali ovládače, znova ich nainštalujte.

3. V okne, ktoré sa objaví po, kliknite na položku Hľadať automaticky a vyhľadajte aktualizovaný softvér ovládača, ktorý umožní automatické vyhľadávanie a inštaláciu ovládačov. Ak ste si ovládače stiahli manuálne, môžete ich prehľadať a nainštalovať kliknutím na možnosť nižšie. Po dokončení procesu skontrolujte chybu.

Metóda č. 4: Opravte BCD
Túto metódu majú používatelia vykonať na svoje vlastné riziko. Toto pre niekoho fungovalo a pre niektorých nie. Po vykonaní krokov v tejto príručke budete tiež musieť znova aktivovať systém Windows.
- Podržte klávesu Windows a stlačte tlačidlo X . Vyberte príkazový riadok (správca)
- Zadajte „ bcdedit“ a stlačte kláves ENTER. Ak je vaša cesta zavádzacieho systému Windows xOsload.exe, musíte odstrániť niektoré súbory a opraviť disk BCD. Môžete to vidieť v poli PATH po vykonaní príkazu „ bcdedit“.
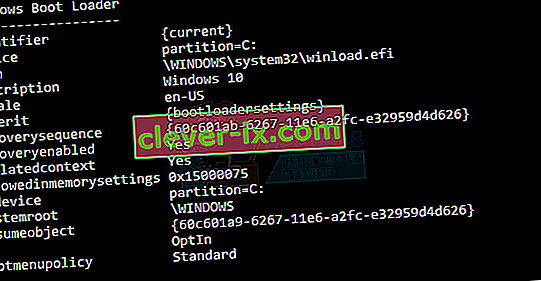
- Po dokončení vykonajte nasledujúce príkazy uvedené nižšie, niektoré sa môžu vrátiť nenájdené, ale chyby ignorovať a pokračovať až do posledného. Uistite sa, že po každom príkaze stlačíte kláves ENTER.

Del D: \ Windows \ System32 \ xOsload.exe Del D: \ Windows \ System32 \ xNtKrnl.exe Del D: \ Windows \ System32 \ Drivers \ oem-drv64.sys attrib c: \ boot \ bcd -h -r -s ren c: \ boot \ bcd bcd.old bootrec / rebuildbcd
Metóda 5: Kontrola aktualizácií systému Windows
Aktualizácie systému Windows často obsahujú opravy niektorých chýb a chýb, ale sú tiež notoricky známe tým, že dávajú prednosť novým problémom v počítačoch ľudí. V tomto kroku však budeme kontrolovať všetky aktualizácie pre váš operačný systém, pretože spoločnosť Microsoft často opravuje všetky problémy, ktoré vychádzajú z ich aktualizácií. Postupujte podľa pokynov uvedených nižšie.
- Stlačením klávesov „Windows“ + „I“ otvorte nastavenia systému Windows.
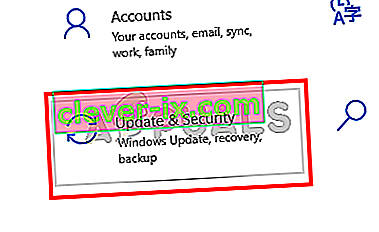
- V nastaveniach kliknite na možnosť „Aktualizácie a zabezpečenie“ a na ľavej strane vyberte možnosť „Windows Update“ .
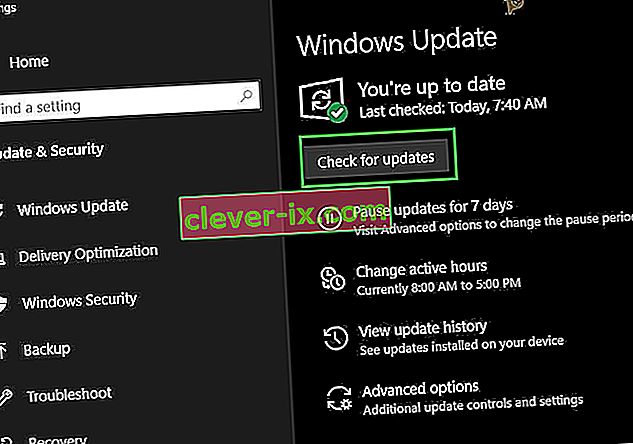
- Na ďalšej obrazovke kliknite na možnosť „Skontrolovať aktualizácie“ a systém Windows automaticky vyzve, aby skontroloval dostupnosť všetkých aktualizácií.
- Po dokončení kontroly aktualizácií kliknite na tlačidlo „Prevziať“ , čím sa spustí sťahovanie a inštalácia nových aktualizácií do vášho počítača.
- Po nainštalovaní týchto aktualizácií skontrolujte, či sa tým problém vo vašom počítači nevyriešil.


Metóda 6: Obnovenie počítača
Ak ste práve začali dostávať tento problém, môže sa spustiť kvôli chybnej inštalácii ovládača alebo dokonca kvôli neoprávnenej aplikácii, ktorú ste si nedávno nainštalovali do počítača. Preto v tomto kroku vrátime stav počítača na skorší dátum a dúfajme, že by to malo vyriešiť náš problém, ak k tomu došlo z vyššie uvedených dôvodov. Za týmto účelom:
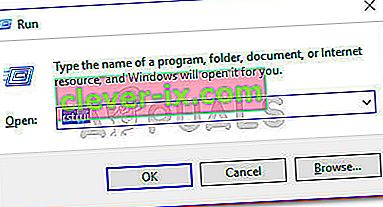
- Stlačením klávesov „Windows“ + „R“ otvorte výzvu Spustiť.
- Zadajte „rstrui“ a stlačte „Enter“, aby ste otvorili okno správy obnovy.
- Kliknite na „Ďalej“ a začiarknite možnosť „Zobraziť viac bodov obnovenia“ .
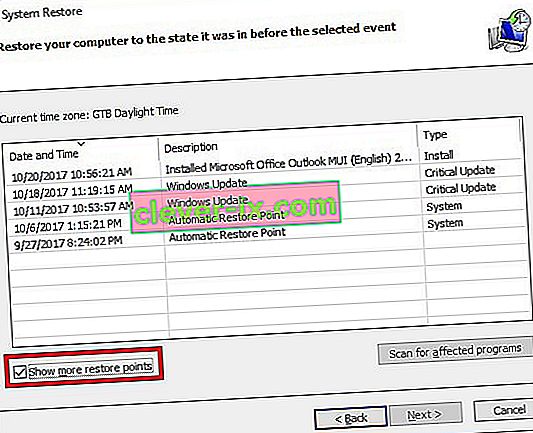
- Vyberte bod obnovenia zo zoznamu, ktorý je pred dátumom, kedy sa začal vyskytovať tento problém.
- Znova kliknite na „Ďalej“ a podľa pokynov na obrazovke vráťte všetko späť k vybratému dátumu.
- Po dokončení obnovy skontrolujte, či problém stále pretrváva.


Metóda 7: Povolenie brány firewall
V niektorých prípadoch je možné, že sa chyba spustí, pretože aplikácia je podozrivá alebo aspoň ak bola označená ako podozrivá a vo vašom počítači nie je spustená brána Windows Firewall, ktorá túto podozrenie overí. Preto sa v tomto kroku ubezpečíme, že je povolená brána Windows Firewall, aby sme sa tejto chyby zbavili. Pre to:
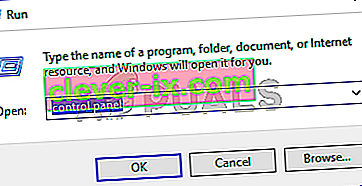
- Stlačením klávesov „Windows“ + „R“ otvorte výzvu Spustiť.
- Zadajte text „Ovládací panel“ a stlačte kláves „Enter“. Spustí sa klasické rozhranie ovládacieho panela.
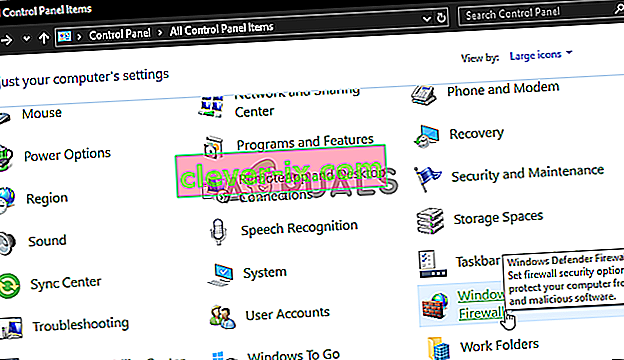
- V ovládacom paneli kliknite na možnosť „Zobraziť podľa:“ a kliknite na tlačidlo „Veľké ikony“ .
- Po vykonaní tohto výberu kliknite na možnosť „Windows Defender Firewall“, čím spustíte bránu firewall, a potom vyberte „Zapnúť alebo vypnúť bránu Windows Defender Firewall“.
- Nezabudnite začiarknuť políčko „Zapnúť bránu Windows Defender Firewall“, ktoré obsahuje obidve dostupné možnosti na zapnutie brány firewall.
- Po vykonaní tohto výberu uložte zmeny a zatvorte okno.
- Potom to skontrolujte, či problém stále pretrváva.


Metóda 8: Spustite skenovanie SFC
V niektorých situáciách ste možno do počítača nainštalovali zlý ovládač alebo v určitom okamihu mohli byť poškodené niektoré systémové súbory alebo ovládače z dôvodu zlyhania úložiska. Preto v tomto kroku spustíme kompletnú kontrolu systému, aby sme identifikovali všetky ovládače, ktorým chýbajú podpisy, alebo aby sme napravili akékoľvek abnormality v systémových súboroch. Pre to:
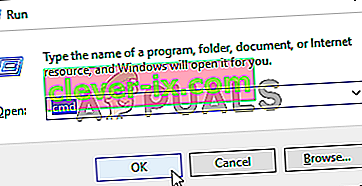
- Stlačením klávesu „Windows“ + „R“ otvoríme výzvu Spustiť.
- Zadajte „cmd“ a potom stlačte „Shift“ + „Ctrl“ + „Enter“ a zadajte oprávnenie správcu. Spustenie príkazového riadku
- Do príkazového riadku zadajte nasledujúci príkaz a vykonajte ho stlačením klávesu „Enter“ .
sfc / scannow
- Let the computer scan for any broken or corrupted items and it should automatically replace them with working ones.
- Check to see if doing so fixes the error message.

Method 9: Disabling Data Execution Prevention
Data Execution Prevention is a program that prevents certain programs or executables from being able to run on your computer because it suspects that they might be viruses. Due to this prevention, sometimes, as a false alarm, legit applications might also face issues while trying to run on your computer. Therefore, in this step, we will be disabling this setting from the system configuration panel. For that:
- Press ‘Windows’ + “R’ to open the Run prompt.
- Type in “Control Panel” and press “Enter” to launch the classical control panel interface.

- Inside the Control Panel, click on the “View By:” icon and then select the “Large Icons” option.
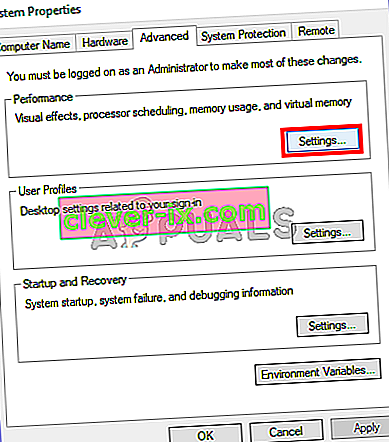
- After selecting Large Icons, select the “System” option.
- Click on the “Advanced System Settings” option on the left side of the screen.
- In the advanced System Settings, click on the “Advanced” tab from the top.
- In the advanced tab, click on the “Settings” option under the “Performance” heading.
- On the next window that opens up, click on the “Data Execution Prevention” tab, and then select the “Turnon DEP for all programs except thoseI Select” option.
- After that, click on the “Add” option and point to the executable of the application that you are facing issues with.
- This way, that application will no longer come under the jurisdiction of the DEP program.
- Check to see if doing so has fixed the issue.


If the above process is unable to fix the issue, it might be because the executable isn’t the only one being affected by the DEP program. Sometimes the DEP might actually be preventing a herd of executables from being run on the computer and to counter this we will be disabling DEP completely.
Disabling DEP completely cannot be done through any Windows setting and it needs to be done manually through the command prompt. Remember to take this step as a last resort because this can in some cases makes your computer more vulnerable to viruses and malware attacks. In order to disable DEP through the command prompt:
- Press “Windows” + “R’ to open the Run prompt.
- Inside the Run prompt, type in “cmd” and then press “Shift” + “Ctrl” + “Enter” to launch in admin mode.
- Inside the command prompt, type in the following command and press “Enter” to execute it on your computer.
bcdedit.exe /set {current} nx AlwaysOff - Once the command has been executed, run the application that you want to and check to see if the error message still persists.
Method 10: Disable Firewall and Windows Defender
In some situations, the executable that you want to run on the computer might actually be blocked by the Firewall and it would not be able to make contact with its servers this way. Therefore, we will have to allow the executable in our Firewall for both public and private networks which should get it working if the Firewall is preventing it.
In addition to that, sometimes the Windows Defender might prevent the application from running on your computer because its local files might be suspicious and not properly signed. This can be due to a false alarm as well so we will be disabling the Windows Defender for the application as well by adding an exclusion. In order to do that:
- Press “Windows” + “R” to launch the Run prompt.
- Type in “ControlPanel” and press “Enter” to launch the classical control panel interface.
- Click on the “View by:” button, select “Large Icons” and then click on the Windows Defender Firewall option.
- Select the “Allow an app orfeature through the Firewall” button on the left pane and then click on the “Change Settings” button and accept the prompt.
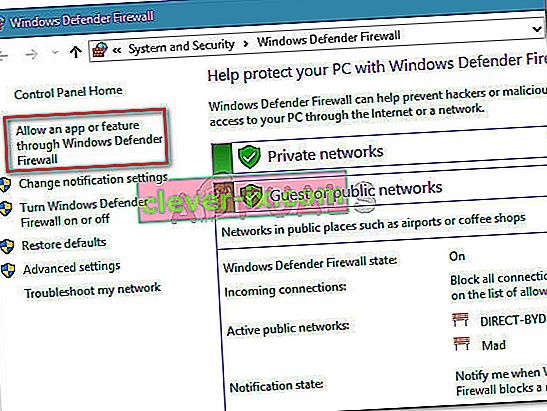
- From here, make sure that you check both the “Public” and the “Private” options for the application and its entries.
- Save your changes and exit out of the window.
- After that, press “Windows” + “I” to launch the settings and click on the “Updateand Security” option.

- From the left pane, click on the “Windows Security” button and then click on the “Virus and Threat Protection” button.
- Select the “Manage Settings” button under the Virus and Threat Protection Settings heading.
- Scroll down and click on the “Add or Remove Exclusions” button in the next window.
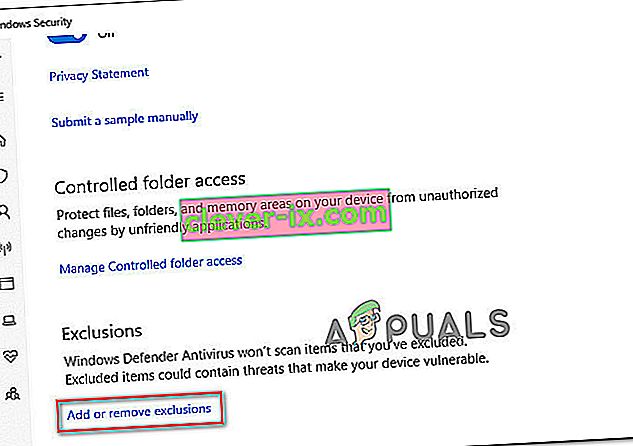
- Click on the “Add an Exclusion” option and select “Folder’ from the File type.
- Make sure to specify the application’s folder with which the issue is occurring and exit out of this window after saving your changes
- Check and see if doing so has fixed the error message.


Method 11: Reinstall Firefox
If you are getting this error while trying to launch Firefox, it might be occurring because the applications haven’t been installed properly on your computer. Therefore, in this step, we will be launching the app management window and uninstalling Firefox after which we will reinstall it completely by downloading it from the Firefox website. For that:
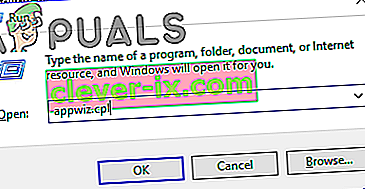
- Press “Windows” + “R” to open the Run prompt.
- Type in “appwiz.cpl” and press “Enter” to open the app management window.
- In the app management window, scroll down and right-click on the “Firefox” application.
- Select “Uninstall” from the list and then follow the on-screen instructions to remove the software from your computer.
- Repeat this step for all instances and bundled applications of the software installed on your computer.
- Make sure to disable any third-party antiviruses at this point to make sure that the software is installed smoothly.
- Head on over to the Mozilla website and click on the download button.

- Click on the downloaded executable and install it on your computer following the on-screen instructions.
- Check to see if doing so has fixed the error message on your computer.


Method 12: Scanning for Malware
It is possible in some cases that the computer has acquired malware that is preventing the user from being able to run all the system functions on their computer. Therefore, in this step, we will be using the default Windows Defender to scan our computer thoroughly for any viruses or malware that might’ve found its way on our computer. For that:
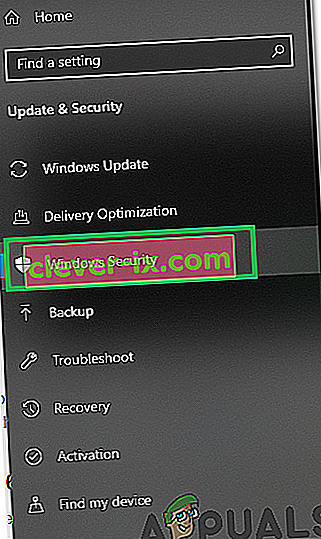
- Press the “Windows” + “I” keys simultaneously on your PC to open the Settings tab.
- Navigate to the Update& Security option and then click on the “Windows Security” button on the left tab.
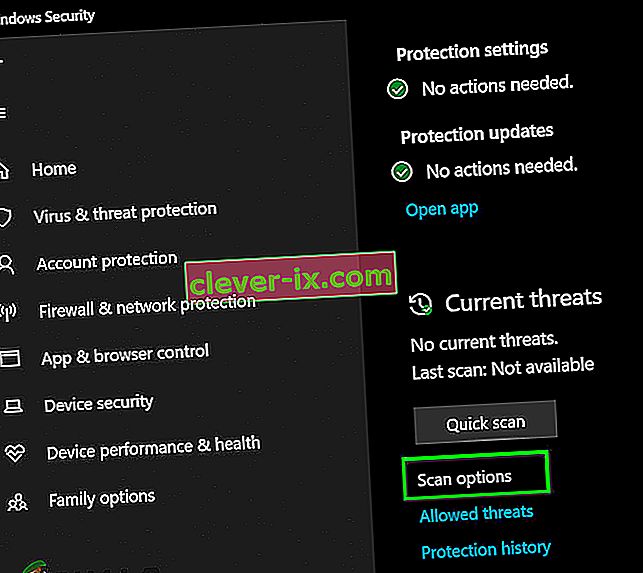
- After that, click on the “Open Windows Security” and select the “Virus and Threat Protection” option.
- After that, click on the “Scan Options” button below the “Quick Scan” window.
- Click on the “Full Scan” option and then hit the button of “Scan Now”.
- Wait for a few seconds while this process gets completed and then finally check if the error gets resolved now.


Microsoft Security Scanner is an additional tool that you can use to test the system for any further viruses and malware because sometimes the default tool isn’t able to perform the scan properly. Therefore, in this step, if the issue still hasn’t been resolved, we will be using the Microsoft Security Scanner to further make sure for any issues.
- Launch your browser and download the Microsoft Security Scanner from here.
- After downloading the executable, run it on your computer and let it install.
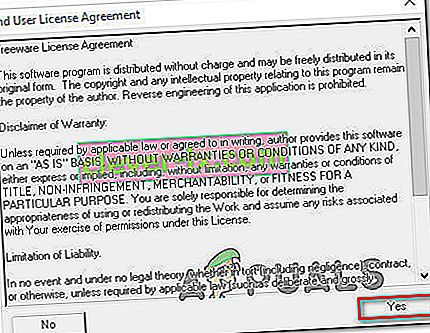
- Accept the License Agreement terms and click on “Next”.
- Select “Full Scan” and click on “Next”.
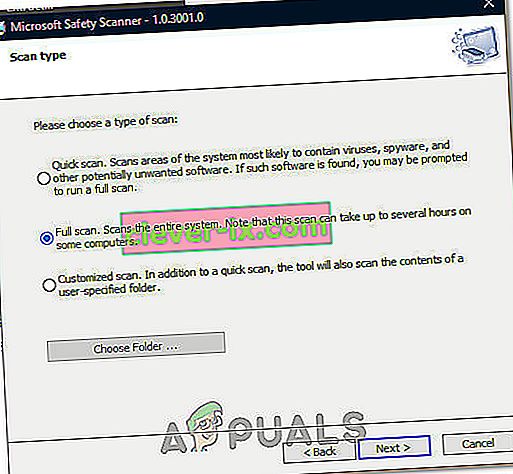
- After you opt for a full scan, the software will start scanning your entire computer to look for any malware or viruses that might’ve disguised themselves as normal executables or applications.
- After this scan has been finished, check to see if the error message still persists.


Method 13: Install Missing Drivers
It is possible in some situations that your device is missing certain drivers due to which this particular issue is being triggered on your computer. Therefore, we will be checking for any missing drivers and then we will check to see if the error is fixed. In order to do this, follow the guide below.
- Download Driver Easy on your computer.

- Run the downloaded executable and install the software on your computer.
- Run the check and see if there are any missing drivers on your computer.
- Install these missing drivers and then install them either manually or automatically using the Software.
- After installing all the missing drivers, check to see if the issue still persists.

Method 14: Reconfigure Registry
It is possible that in some cases, you haven’t properly configured all the registry settings or that you unknowingly configured something incorrectly. Therefore, in this step, we will be reconfiguring our Registry to fix a certain key that sometimes, if misconfigured, causes this particular error on Windows. In order to do this, follow the guide below.
- Press “Windows” + “R” to open the Run prompt.
- Type in “regedit” and press “enter” to launch the registry editor.
- Inside the registry editor, navigate to the following location.
HKLM\SOFTWARE\Microsoft\Windows NT\CurrentVersion\Windows\AppInit_Dlls
- Double click on the “LoadAppInit_DLLs” entry on the right side of the screen.

- Change the value of this registry from “1” to “0”.
- Save your changes and exit the registry editor.
- Check to see if doing so has fixed the error.


Method 15: Update Disk Drivers
In some cases, the Disk Drivers that are being used to control your Storage and other Disks installed on the computer might have been outdated due to which the error is being triggered. Therefore, in this step, we will first be opening the Device Management Window and from there, we will be updating these drivers. In order to do so, follow the steps mentioned below.
- Press “Windows’ + “R” to open the Run prompt.
- Type in “Devmgmt.msc” and press “Enter” to launch the device management window.

- In the Device Manager, double click on the “DiskDrives” option to expand it.
- Right-click on the storage device listed and select the “Update Driver” option.
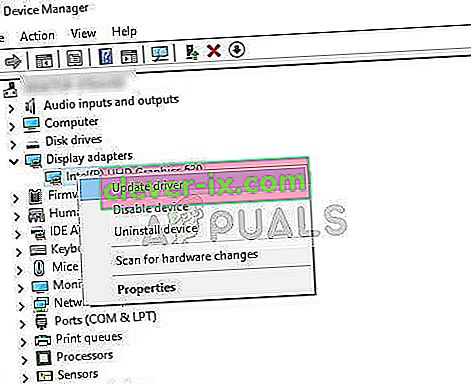
- Select the “Search Automatically for Drivers” option and let the setup search.
- If there are any drivers available, Windows will automatically check for them and install them on your computer.
- Check to see if doing so has fixed the issue.


Method 16: Disabling Automatic Updates and Uninstalling Updates
It is possible in some cases, that this error is stemming from a faulty update install. Microsoft is notorious for pushing out updates that aren’t properly customized to work for all hardware combinations and often go on to break things instead of making them better. Therefore we will make sure that the recent update isn’t installed on our computer.
In order to do this, we will have to first disable automatic updates on our computer and then we will be uninstalling the recently installed updates. Make sure to back up any important data that you don’t want to lose just in case this goes bad.
- Press “Windows” + “R’ to open the Run prompt.
- Type in “service.msc” and press “Enter”.
- Scroll through the list and double click on the “Windows Update” service.
- Click on the “Stop” button and then click on the “Startup Type” dropdown.
- Select “Disabled” from the list and select the “Apply” button from the window.
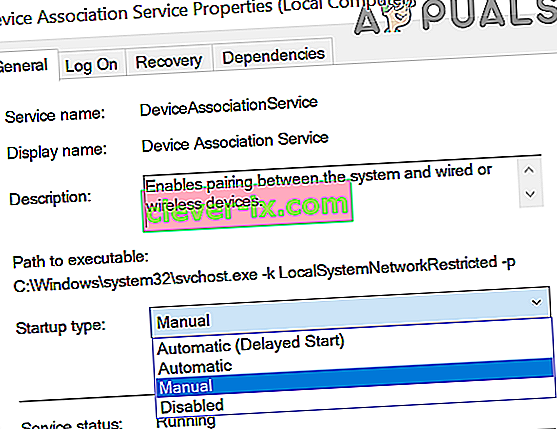
- Click on “OK” to close out of this window.
- Check to see if doing so has stopped your computer from updating.


After stopping the computer from updating, we will now be uninstalling the recent updates that have been installed on your computer. For that:
- Press “Windows” + “I” buttons to open the settings.
- In settings, click on the “Update and Security” option and then select the “Windows Update” button from the left pane.

- In the Windows Update, click on the “View Update History” option.
- In the Update History, click on the “Uninstall Updates” option and it should take you to the uninstallation screen where all the recently installed updates will be listed.
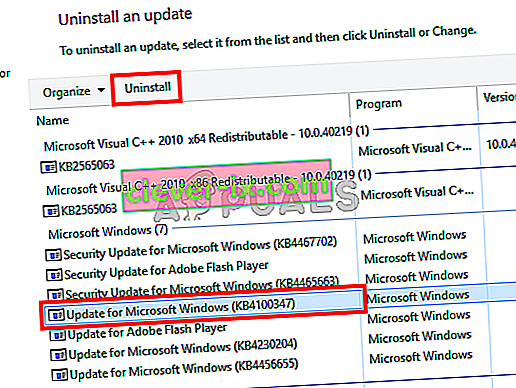
- From the list, right-click on the update that was installed recently and caused this error on your computer.
- Right-click on this update and select the “Uninstall” button to remove it completely from the computer.
- Follow through with the on-screen instructions.
- Check to see if uninstalling has fixed this issue.


Additional Fixes:
- In addition to some of the recommendations given above, you should try to check if there are any bad memory modules (RAM) installed on your computer which can be a cause of this.
- Nezabudnite tiež skontrolovať, či ste nepretaktovali pamäť RAM na úroveň presahujúcu odporúčaný limit. Ak ste to urobili, skúste to vrátiť na predvolené nastavenia od výrobcu a skontrolujte, či sa tým problém vyrieši.


